Subscribe now and get the latest podcast releases delivered straight to your inbox.
21 Basic HTML Codes Everyone Who’s Not a Developer Should Know

Jun 1, 2021

 If you’re anything like I was before I started working at IMPACT, you probably don’t know much about HTML, CSS, coding, or development of websites.
Maybe you know a couple coding elements, but have been wanting to learn some more, or perhaps, you don't even know that HTML stands for Hyper Text Markup Language. (Did you?)
Fortunately, my past two and a half years here have made me into a something of a coding...amateur (I can’t say "expert" because let’s be real; I can’t build a website or anything).
Basic HTML has become an acquired skill of mine, mostly due to the fact that I’m using HubSpot every day, but one of the biggest reasons I learned some of these codes is because I was tired of asking my developers the simplest questions — and I’m pretty sure they were tired of me, too.
If you find yourself in the same boat as me, publishing blogs, managing websites, and more, hopefully, the following basic HTML codes can help make your day a little bit easier.
21 HTML basics every non-developer should know
1. Headings
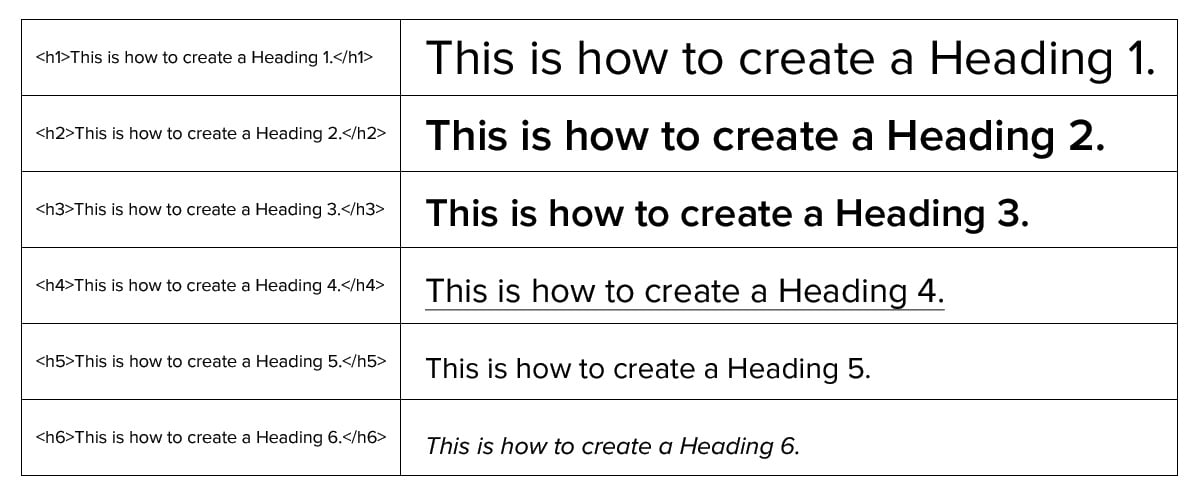
Headings may be one of the easiest codes to learn and considering how crucial they are to your SEO, it's a good thing. There are six different types, as seen below. To create a heading, simply wrap your text in the heading tags of your choice:

2. Paragraphs
What would a nice heading be without a paragraph to elaborate on the message? To get a paragraph like the one you're reading now, simply wrap your text in <p> tags like the example below, and don't forget to close it with a </p> tag!
<p>Hey, I'm a paragraph!</p>
Hey, I'm a paragraph!
3. Links
Inbound marketing is nothing without linking your already-great content to other relevant articles and website pieces. Try linking a word or phrase in your paragraph by using the following <a> code:
<a href="https://www.impactplus.com">Let's visit IMPACT's awesome website!</a>
This miraculously turns into: Let's visit IMPACT's awesome website!
The href part of the code sentence specifies the destination website address you want your link to go to.
4. Images
This is a fun one. Images make everything better, and they make your content a lot more appealing to the reader. Insert an image like this:
<img class="lazy" data-src="https://cdn2.hubspot.net/hubfs/145335/Cute-Puppy.jpg" alt="Cute-Puppy" style="width:500px;height:333px;">
The image tag is empty because it only contains attributes, so it doesn't need to be closed. The attributes listed above include "src" or image URL. I also included the image alt text (important for SEO purposes), and some styling properties (width and height).
You can customize your image however you'd like. Oh, and for all you puppy lovers out there — like me — here is the actual image I coded above:

5. Line break
A line break is also an empty element, so it doesn't need to be closed. A line break is basically an intentional space between two lines of text, created with <br>.
<p>Place a line break underneath this sentence.
<br>
Place a line break above this sentence.</p>Place a line break underneath this sentence
Place a line break above this sentence.
Once the HTML above is converted, you can tell that there's less space between the first line and the second one, as compared to separating two paragraphs with <p> tags. Adding a line break helps keep sentences within the same paragraph on different lines.
6. Bold and strong
To make something bold, there are two code elements that work. However, my developers tell me that <strong> is used much more than <b>. Don't forget to close the <strong> tag! </strong>
<strong>Bold a whole sentence!</strong>
Or only <strong>bold</strong> one word!Bold a whole sentence!
Or only bold one word!
7. Italic and emphasized
Italic and emphasized text are similar to bold and strong text. There are two code elements, but one is used more than the other. In this case, <i> will work, but <em> is more commonly used.
<em>This sentence is super fancy.</em>
This sentence is super fancy.
8. Underlined
Bold, italicized, and now underlined. This one is just as easy as the other two. Just wrap the text you want underlined in <u> tags, like this.
<u>Look, we can underline!</u>
Look, we can underline!
9. Ordered lists
There is a difference between an ordered list and an unordered list. The ordered list contains numbers, while the unordered list contains bullet points. They both follow the same structure, but one letter changes.
Here is the code sentence for an ordered list. The <ol> is the entire "ordered list," while the <li> is a "list item." You can include as many list items as you need.

10. Unordered lists
Only one letter change is needed to switch from an ordered list to an unordered list.

11. Superscript
To insert a superscript format within your text, wrap the text you want to appear superscripted in <sup> tags. </sup> You'll end up with something like this.
Trademarks should be written in superscript<sup>TM</sup>.
Trademarks should be written in superscriptTM.
12. Subscript
If you know how to superscript, you should know how to subscript. Just use <sub> tags </sub> so you get text like this.
Sometimes, citations are written in subscript.
Sometimes, citations are written in subscript.
13. Horizontal line
Want to break up sections of a page or article? Try a horizontal line! Just use the empty element (no need to close it), <hr>.
Insert a horizontal line between me and sentence 2.
<hr>
Hi, I'm sentence 2.
Insert a horizontal line between me and sentence 2.
Hi, I'm sentence 2.
14. Marked or highlighted text
I bet you didn't know that you could highlight text through an HTML code, did you? It's so cool and so easy. Wrap the text to be highlighted in <mark> tags </mark> so that you get a cool highlighted feature.
Only highlight the <mark>most important notes</mark>.
Only highlight the most important notes.
15. Deleted (cross-through) text
If you want to display the cross-through effect on your text (maybe you created a task list and want to cross out each one as you go), there's a code for that. Try crossing out full sentences or even just one word by using <del> tags. </del>
<del>Feed the dog.</del>
<del>Write my blog article.</del>
Make dinner.
Feed the dog.Write my blog article.
Make dinner.
16. Short and long quotations
By now, you may be wondering how I'm putting all of my examples in a text box. Well, surprise! There's a code for that, too. It's actually called a blockquote or a long quote. You can see the difference between a long quote and a short quote (normal quotation marks) below.
<blockquote>All of this text will be in a blockquote like the rest of the examples.</blockquote>
<q>I'm quoting this because I'm saying it out loud.</q>All of this text will be in a blockquote like the rest of the examples.
I'm quoting this because I'm saying it out loud.
17. Setting a specific font
The next few are going to get a bit trickier, so try to stay with me. Now that you know how to create a heading, a paragraph, and stylized text, it'll be useful for you to know that you can easily change the font using the element "font-family."
Don't forget all of the small details, such as the equal sign, quotation marks, and semi-colon. Check out the examples below.
<h4 style="font-family:Georgia;">I want to change this header to Georgia font.</h4>
<p style="font-family:Verdana;">I want to change this paragraph to Verdana font.</p>
I want to change this header to Georgia font.
I want to change this paragraph to Verdana font.
18. Setting a specific text color
This one uses the same code type as the previous example, but instead of using font-family, you use "color." You can experiment with actual colors (blue, red, orange, etc.), or you can also insert hex colors to customize your text to your brand.
<p style="color:blue;">The sky is really blue today.</p>
<p style="color:#ff471a;">The fire is a reddish-orange.</p>The sky is really blue today.
The fire is a reddish-orange.
19. Setting a specific text size
Again, this one uses the same basic code logic, but uses the element "font-size." Put your font sizes in pixels, or px.
<p style="font-size:36px;">Make this paragraph size 36 font.</p>
<p style="font-size:12px;">Make this paragraph size 12 font.</p>Make this paragraph size 36 font.
Make this paragraph size 12 font.
20. Setting a specific text alignment
Left, centered, right, or justified. How do you like your text? Make it any way you'd like with "text-align."
<p style="text=align:center;">This paragraph should be centered.</p>
<p style="text-align:right;">This paragraph should be right aligned.</p>This paragraph should be centered.
This paragraph should be right aligned.
21. Tables
I saved the best for last! Well, I don't know if it's the best, but I think it's pretty darn cool. The HTML code for creating a table can become pretty intricate, but if you get the hang of the basics, you shouldn't have too much of an issue.
I'll show you how to create a simple table below.
To make it easier to understand, <tr> stands for table row, while <td> stands for table data. Keep in mind that you can change the font, text size, text color, text alignment, and more.

Start coding!
The 21 codes you just read about are great ones to start practicing to build your HTML skills. Once you’ve got the hang of these, as I’m sure you can imagine, there are a million more to learn. A great resource you can utilize to continue your education is Codeacademy, an online, interactive coding platform.
If there’s anything else you’d like us to cover, such as stylizing your table, changing the color, font, or size of single words or phrases within your paragraphs, or linking images, please reach out!
Free: Assessment