Subscribe now and get the latest podcast releases delivered straight to your inbox.
HubSpot is arguably the only true all-in-one inbound marketing platform on the market.
Since its inception, the company has constantly expanded its collection of features and tools to keep up with marketing best practices.
Even as the demand for conversion rate optimization (CRO) tools has increased in the last several years, for example. HubSpot has faithfully accommodated us with powerful and seamless tools to improve conversions.
In usual HubSpot fashion, it allows you to focus on strategy over technicality by performing various CRO tasks without having to enter a line of code.
In this chapter, we’re going to show you the two biggest CRO tools in HubSpot and discuss how you can get the most value from them.
A/B Testing
One of the best features of HubSpot is that is has A/B testing built into the Enterprise package, allowing you to easily test a variety of elements on your landing pages using these simple steps:
Step 1
Create a landing page if you don’t already have one in mind that you’d like to optimize conversions on.
Step 2
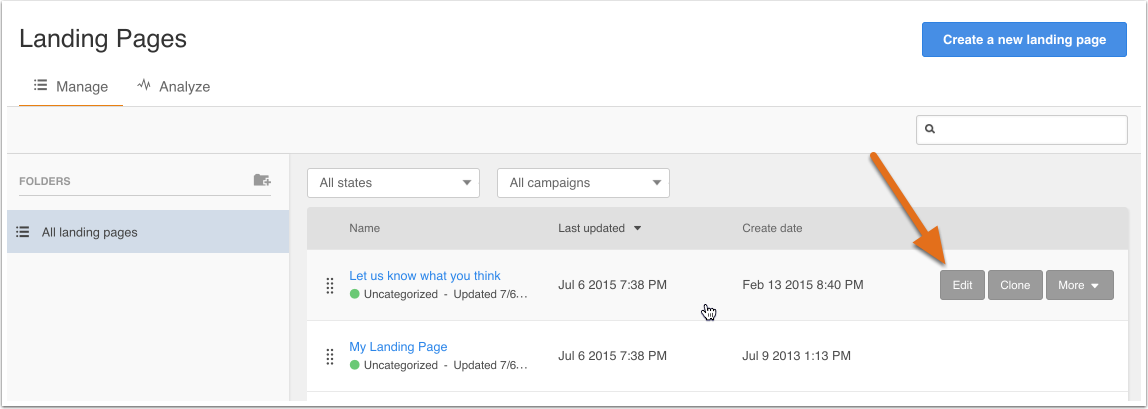
Click Edit to open the landing page for editing.
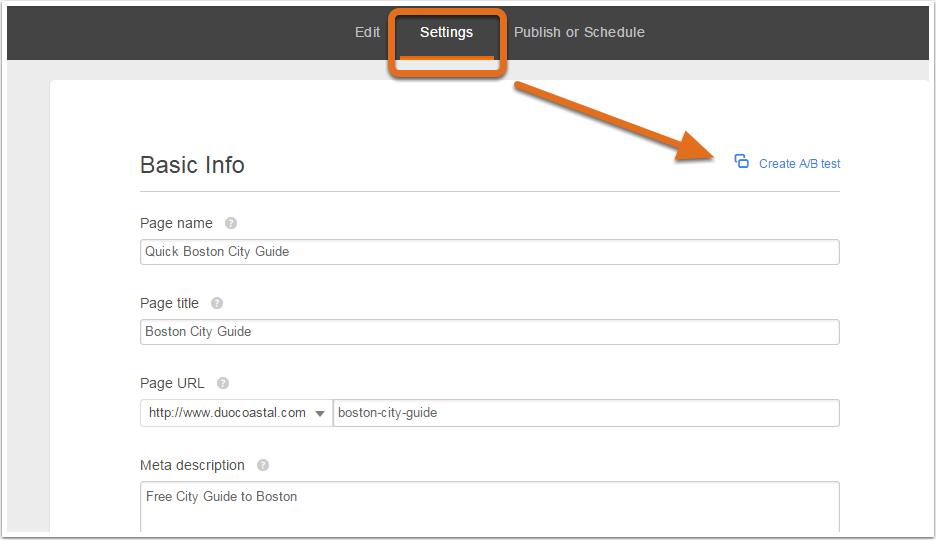
Then navigate to Settings and click the Create A/B Test link.
Step 3
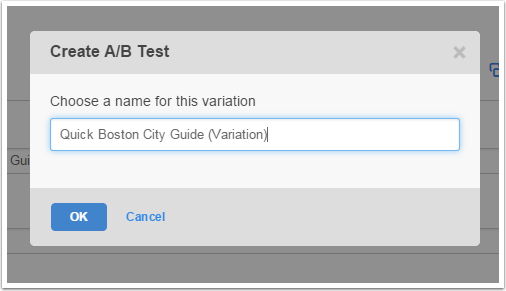
Give your new variation (the element you’re testing) a name.
Step 4
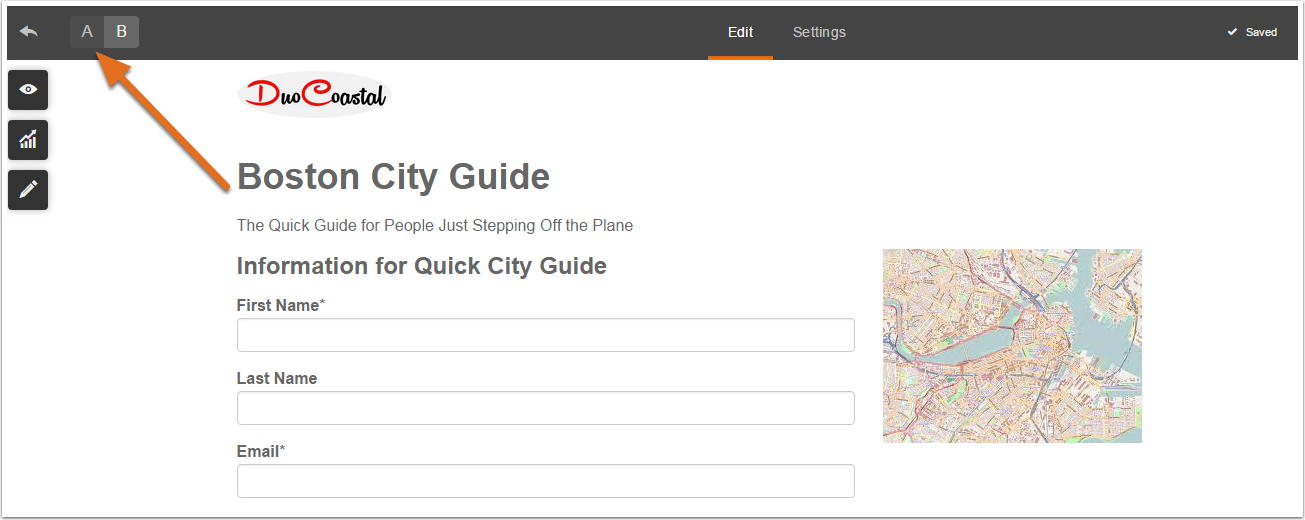
Edit the element you are testing on the B version of your landing page.
These are the variables you should consider testing:
- Offers – Test out different types of Offers, such as eBooks and whitepapers.
- Copy – Try different headline variations, paragraph formatting, benefit descriptions, etc.
- Image – Test different images, such as images with/without people, your product in the wild, screenshots, etc.
- Form Fields – In general, more form fields equals less conversions. However, you need to collect enough information to qualify leads. Keep testing until you find the right balance.
Step 5
To view the results of your A/B test(s), click on the Variations tab from the landing page details. From there you can filter by Submissions, New Contacts, and Customers.
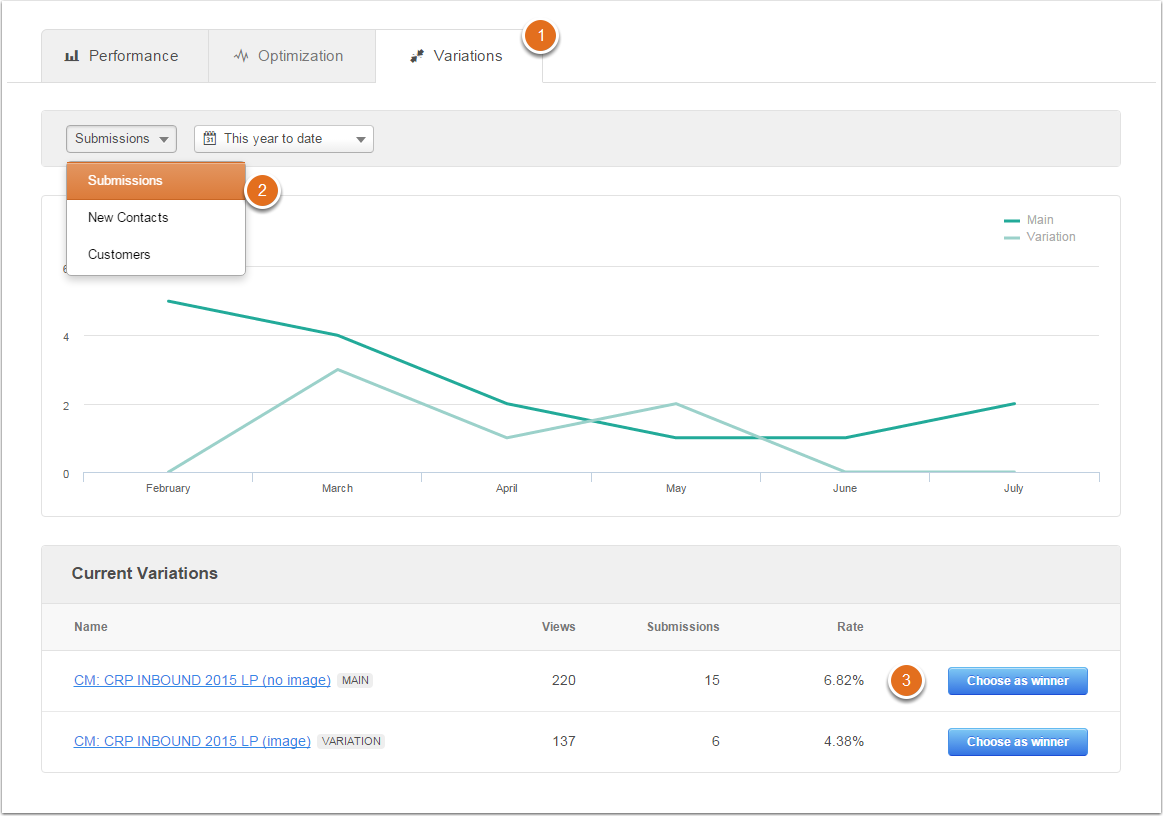
Once you are satisfied with your results, you can click Choose a winner by the winning variation, which will instruct HubSpot to stop showing other variations to website visitors.
How to Get the Most From A/B Tests in HubSpot
HubSpot provides several guidelines for effective A/B testing, whether its with or without their software.
- Run one test per page at a time to ensure you are clearly tracking the results of each test. If you run multiple tests on one page simultaneously it will be difficult to figure out which test is directly contributing to the change in conversion rates.
- For the same reasons as above, only test one variable at a time on a landing page.
- Once you’ve singled out several variables, you can A/B test an entire page. For example, instead of testing button color or background color, you can change everything and test this completely new page against the original. If the new variation wins, start singling out specific variables again to refine those results.
- Don’t focus exclusively on conversion rates. Also monitor how your A/B tests affect click-through rates, leads, traffic-to-lead conversion rates, and demo requests.
- Always include a “control” in your A/B tests – the version you are testing a new variable against. Otherwise, you won’t be able to accurately measure results and progressively improve conversions.
Please note, you can also run A/B tests on CTAs and emails through HubSpot using a similar process. Learn more here.
Smart Content
Personalization is the future of marketing and advertising.
It’s also the natural next step for improving Inbound Marketing – which has always aimed to deliver a more personalized marketing experience. Fortunately, HubSpot allows you to implement smart content through their Content Optimization System.
According to HubSpot, personalized content dramatically improves a website’s lead generating performance and engagement with users. After examining over 93,000 calls-to-action created by the company over a 12 month period, HubSpot found that personalized calls-to-action performed 42% better than generic calls-to-action.
HubSpot’s Website Platform
When a new user visits your website, they view the “default” content that’s created for anyone that visits your website. Take a look at the images below to see this in action.
Here is an example of default content served to first-time visitors.
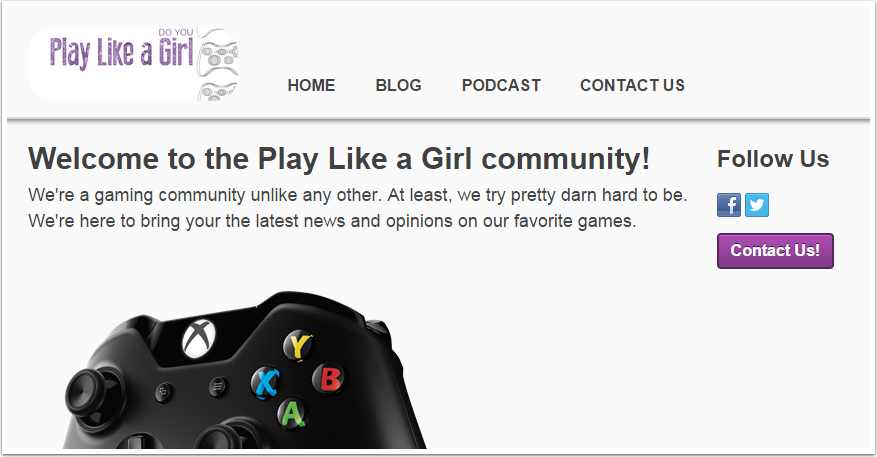
Once someone becomes a Contact in HubSpot by filling out a form or becoming a customer, you will be able to serve them personalized content based on their information.
You can see the difference illustrated in the image below.
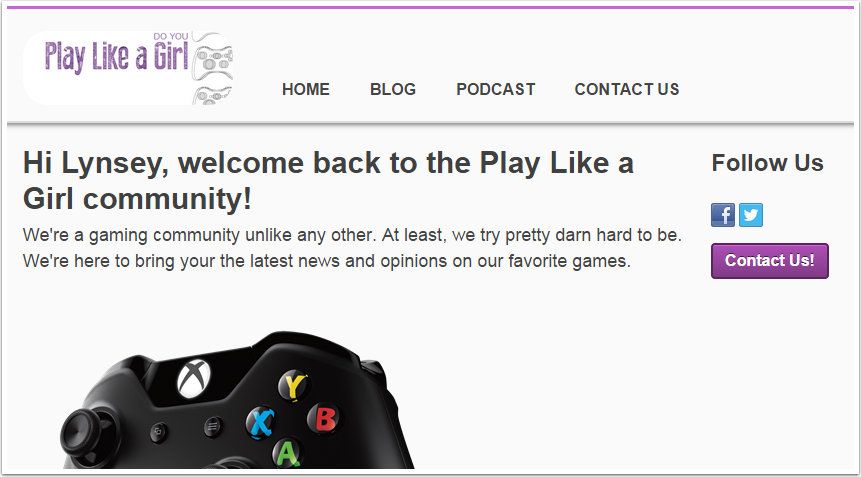
The smart content knows the name of your visitor and addresses them personally, making the experience more friendly and engaging.
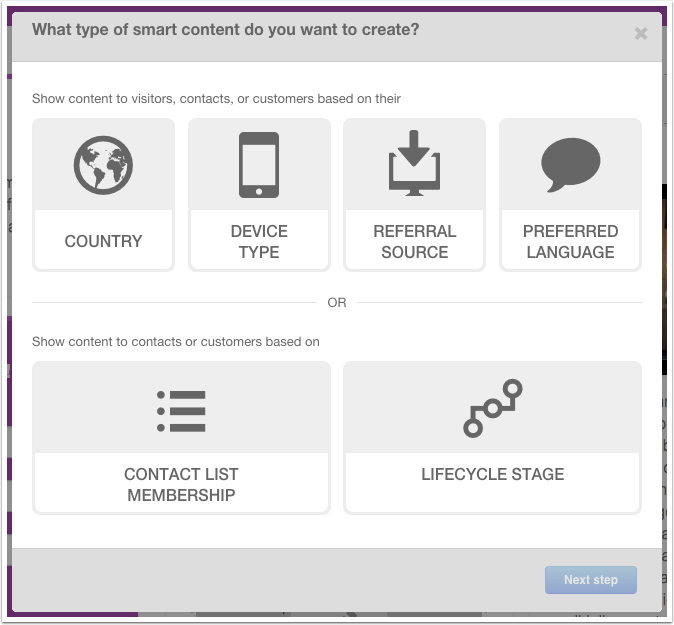
There are five different segments you can use to target visitors with Smart Content:
- Country (only available on website/landing pages) – Determined by the IP address of the visitor.
- Device Type (only available on website/landing pages) – If your page has a lot of copy, you should consider creating a condensed version for mobile visitors to create a better user experience.
- Referral Source (only available on website/landing pages) – Show smart content based on the visitor’s traffic source, which is especially useful for advertising campaigns.
- Preferred Language (only available on website/landing pages) – Content is personalized based on the language set in the user's web browser.
- Contact List Membership – Show smart content based on whether or not the user is on one of your lists or based on which list they’re subscribed to. This is a great way to follow-up after a visitor downloaded an offer, attended an event, or anything else related to that particular list.
- Lifecycle Stage – Customize content based on which lifecycle stage a Contact is in. This feature is very powerful for lead nurturing and moving leads down the funnel towards converting to a customer.
For Personalization, you can choose between four different categories:
- Contact – Includes First name, Last name, and Email Address.
- Company – Includes Total Revenue, Industry, and Company Name.
- Office Location – Includes City, State, and Zip Code.
- HubSpot Owner – Includes First Name, Last Name, and Signature (all of which belong to the HubSpot user).
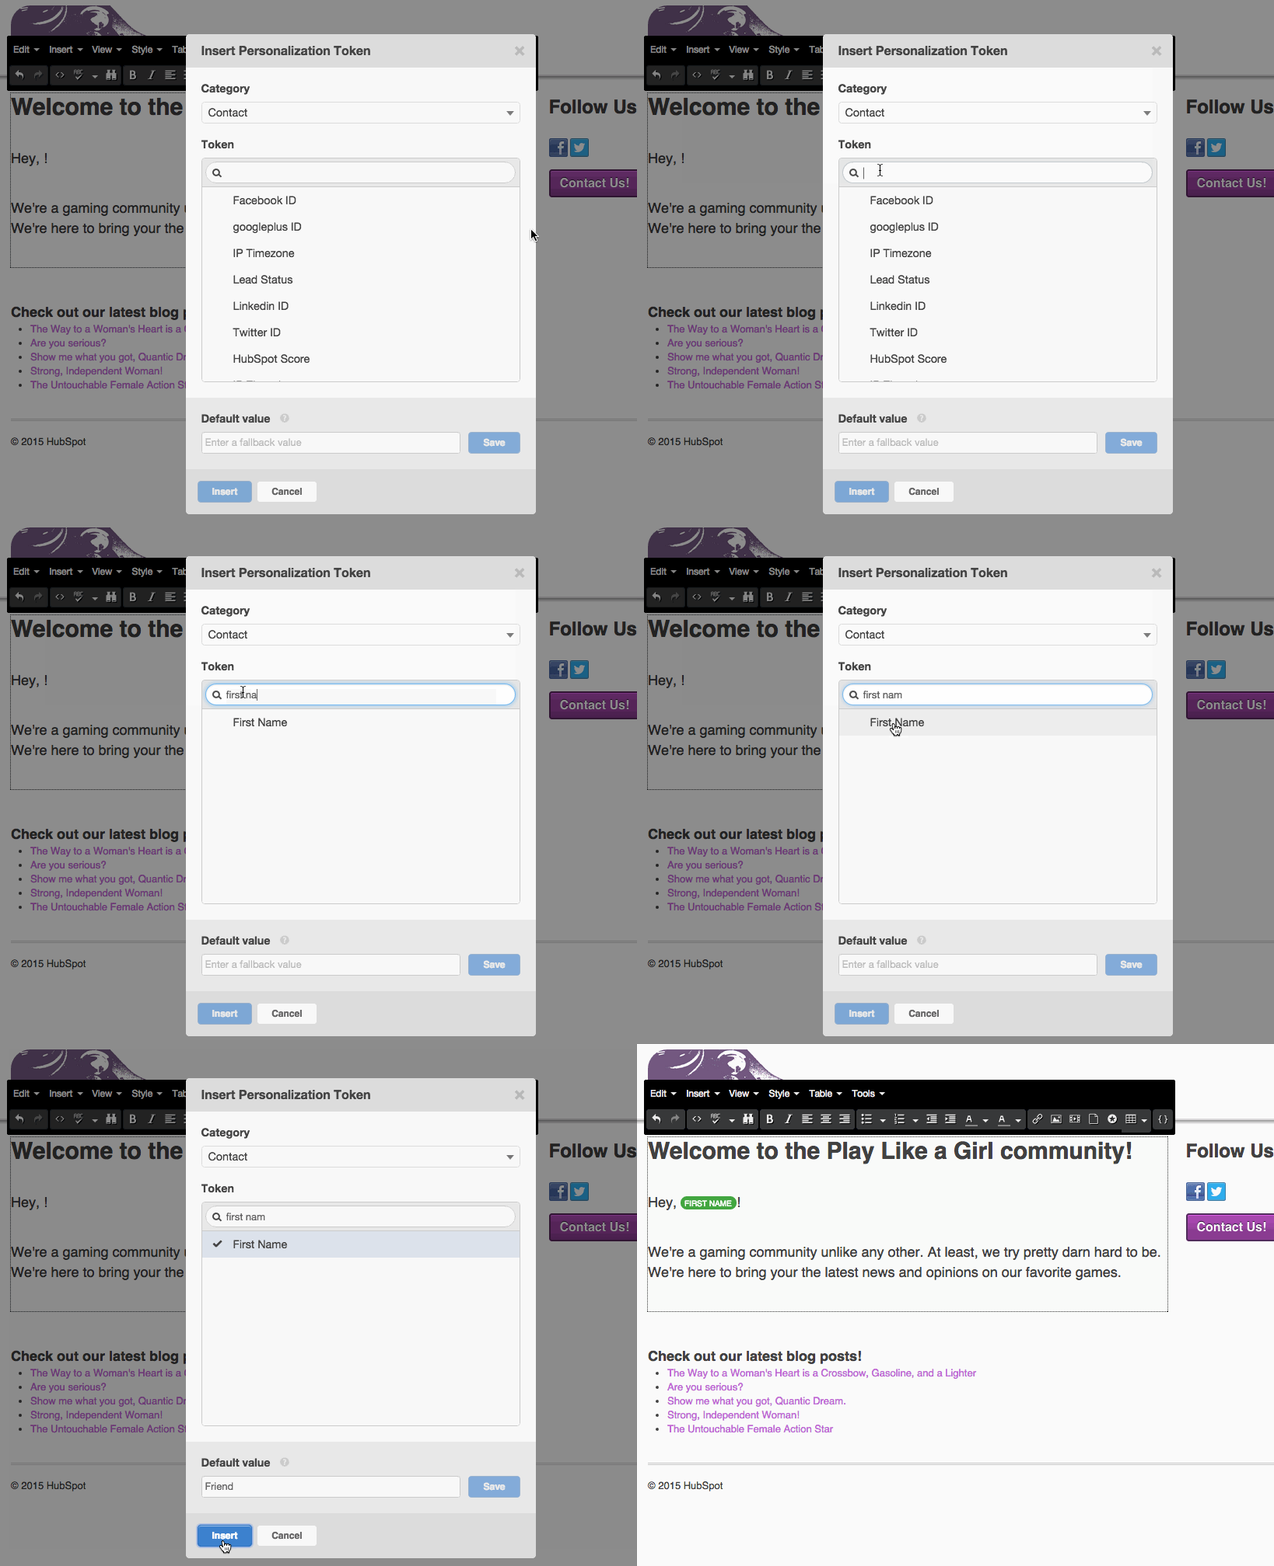
It’s a good idea to keep your personalization limited to scenarios where it makes sense or sounds natural, and even if it does, you’ll want to create a “default value” just in case this field is not available for a contact.
Recommended resources:
- How to create smart text
- How to create a smart form
- How to create a smart call-to-action (CTA)
- How to create smart content in a HubSpot email
The IMPACT team are masters of the HubSpot Website Platform and conversion rate optimization on it. Learn all about our Website Redesign and CRO services here.
Conversion Rate Optimization Using Hotjar
The content above was an excerpt of our new guide, "The Inbound Master's Guide to Conversion Rate Optimization" To learn more about CRO, testing, and how HubSpot can be used in these efforts, get your free copy of the full guide by clicking "Get it Now" below.


