How to Create a Facebook Remarketing Campaign
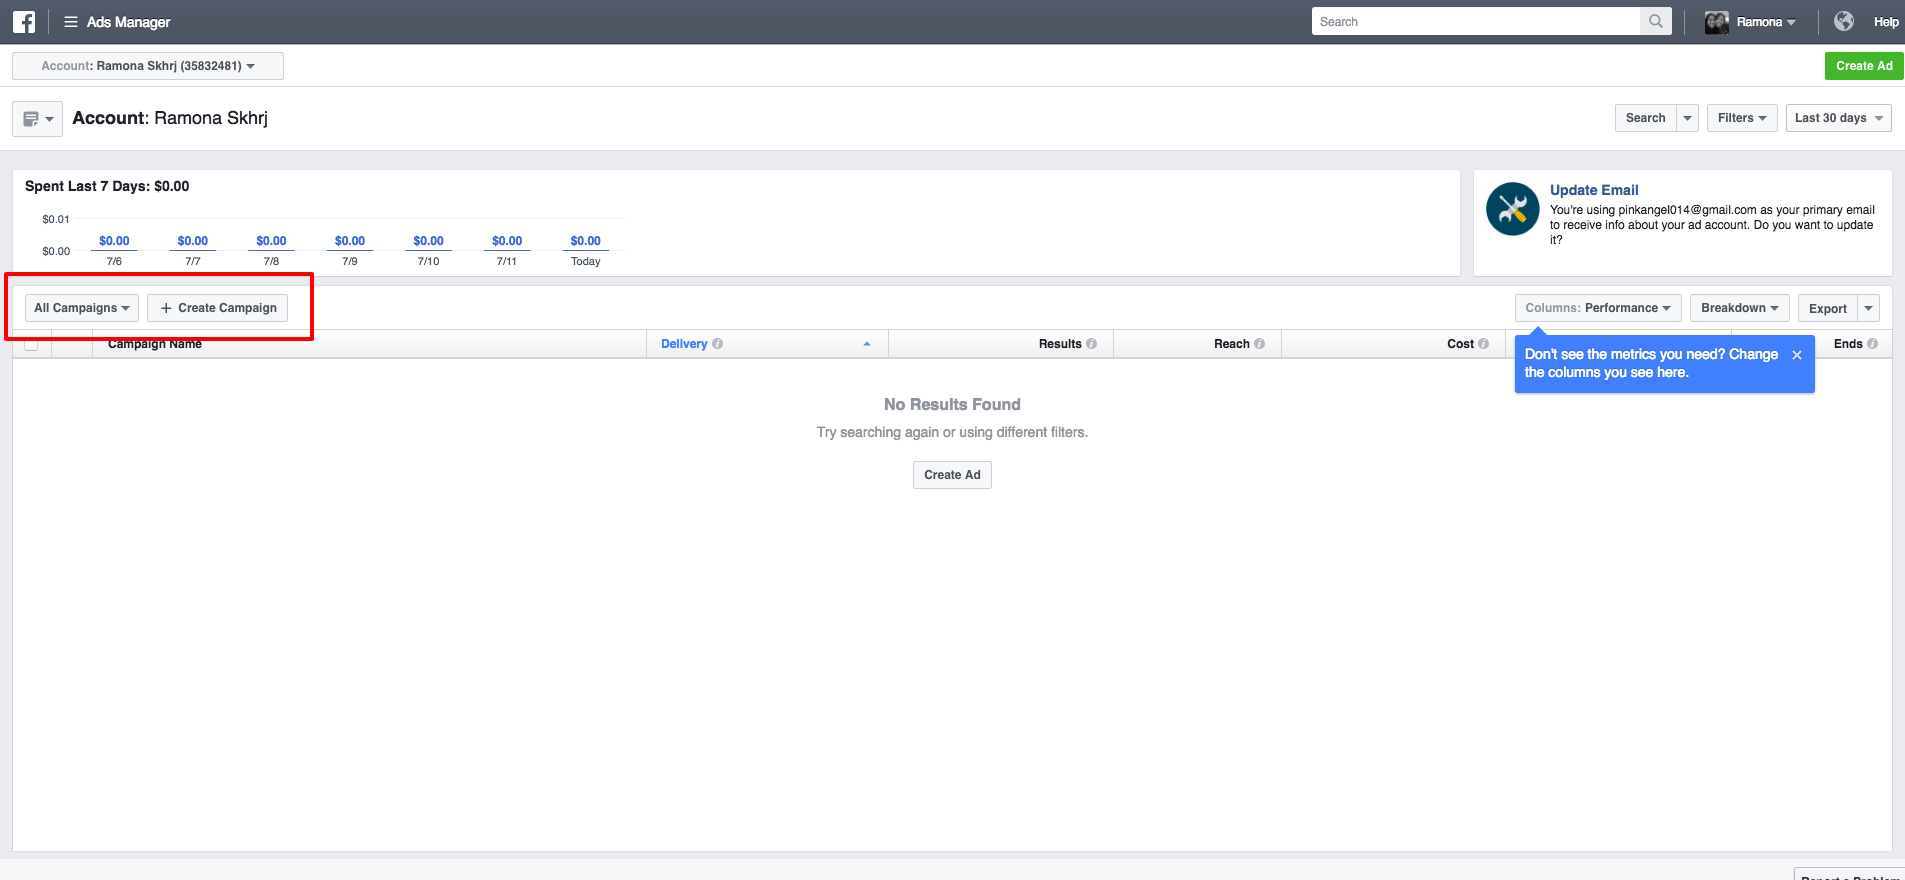
- Navigate to your Ads Manager to create and add a Meta Pixel to your site.
- Create a Custom Audience based on website visits & on the specific page of your site that you will want to target.
- Select the campaign objective.
- Customize your audience, placement, and the budget you want to allocate towards this campaign.
- Create the image graphic that will be your Facebook Ad.
I’m not going to lie, I thought Facebook was losing serious steam a little over a year ago. I was simply not seeing the results. But I was wrong, and I’ll admit that.
Facebook is stronger than ever and marketers are really starting to see that.
We just have to look at some simple numbers to remind us the astonishing amount of active users this social network still carries.Alexa.com, a leading analytics company, has them ranked as the number 3rd most visited site globally. That’s just behind Google and YouTube. (Now, we know they generate a ton of traffic.)
We can also take a look at the statistics that Facebook gave in 2015 in a big press release for further reassurance. Last year, the social network hit a major milestone of 1 Billion logins within 24 hours. Yes, 1 billion -- and that number is continuing to rise.
So, as marketers, the big question we have to ask is how we can use this as a tool to drive visitors and leads.
One of the best, and most effective ways I found is running a Facebook remarketing campaign; a simple one that can help you get that spike to hit your objectives and goals that you've been looking for.
How to Create a Facebook Remarketing Campaign in 4 Easy Steps
For those who might be new to remarketing (or retargeting to others), it’s simply a way to place your content in front of visitors who have already visited either your site, service offering, eBook page, blog article, or product, but not made a purchase.
By tracking your website visitors, you have the ability to deliver relevant content via a sponsored ad in their newsfeed on sites such as Facebook, after they've already left yours.
For example, say you were selling mountain bikes. You can publish a blog article on “The Top Five reasons you Should Upgrade to a Full Suspension Mountain Bike.”
Now, if you set up your Facebook remarketing campaign correctly, you will have the opportunity to place an ad for say your latest eBook in a prospect's newsfeed the next time they log in.
This gives us a way to keep your brand or product top-of-mind and get users to come back to your website.
It's a pretty cool asset we have at our fingertips. Now how do we set this up? Here is a step-by-step guide on how to do so.
1. Navigate to Your Ads Manager
You can find your Facebook Ad Manager in a couple of places. In the image below, you can find this on the left-hand navigation or in the top, right-hand dropdown. You can also find this on your business page under the “Promote” dropdown.
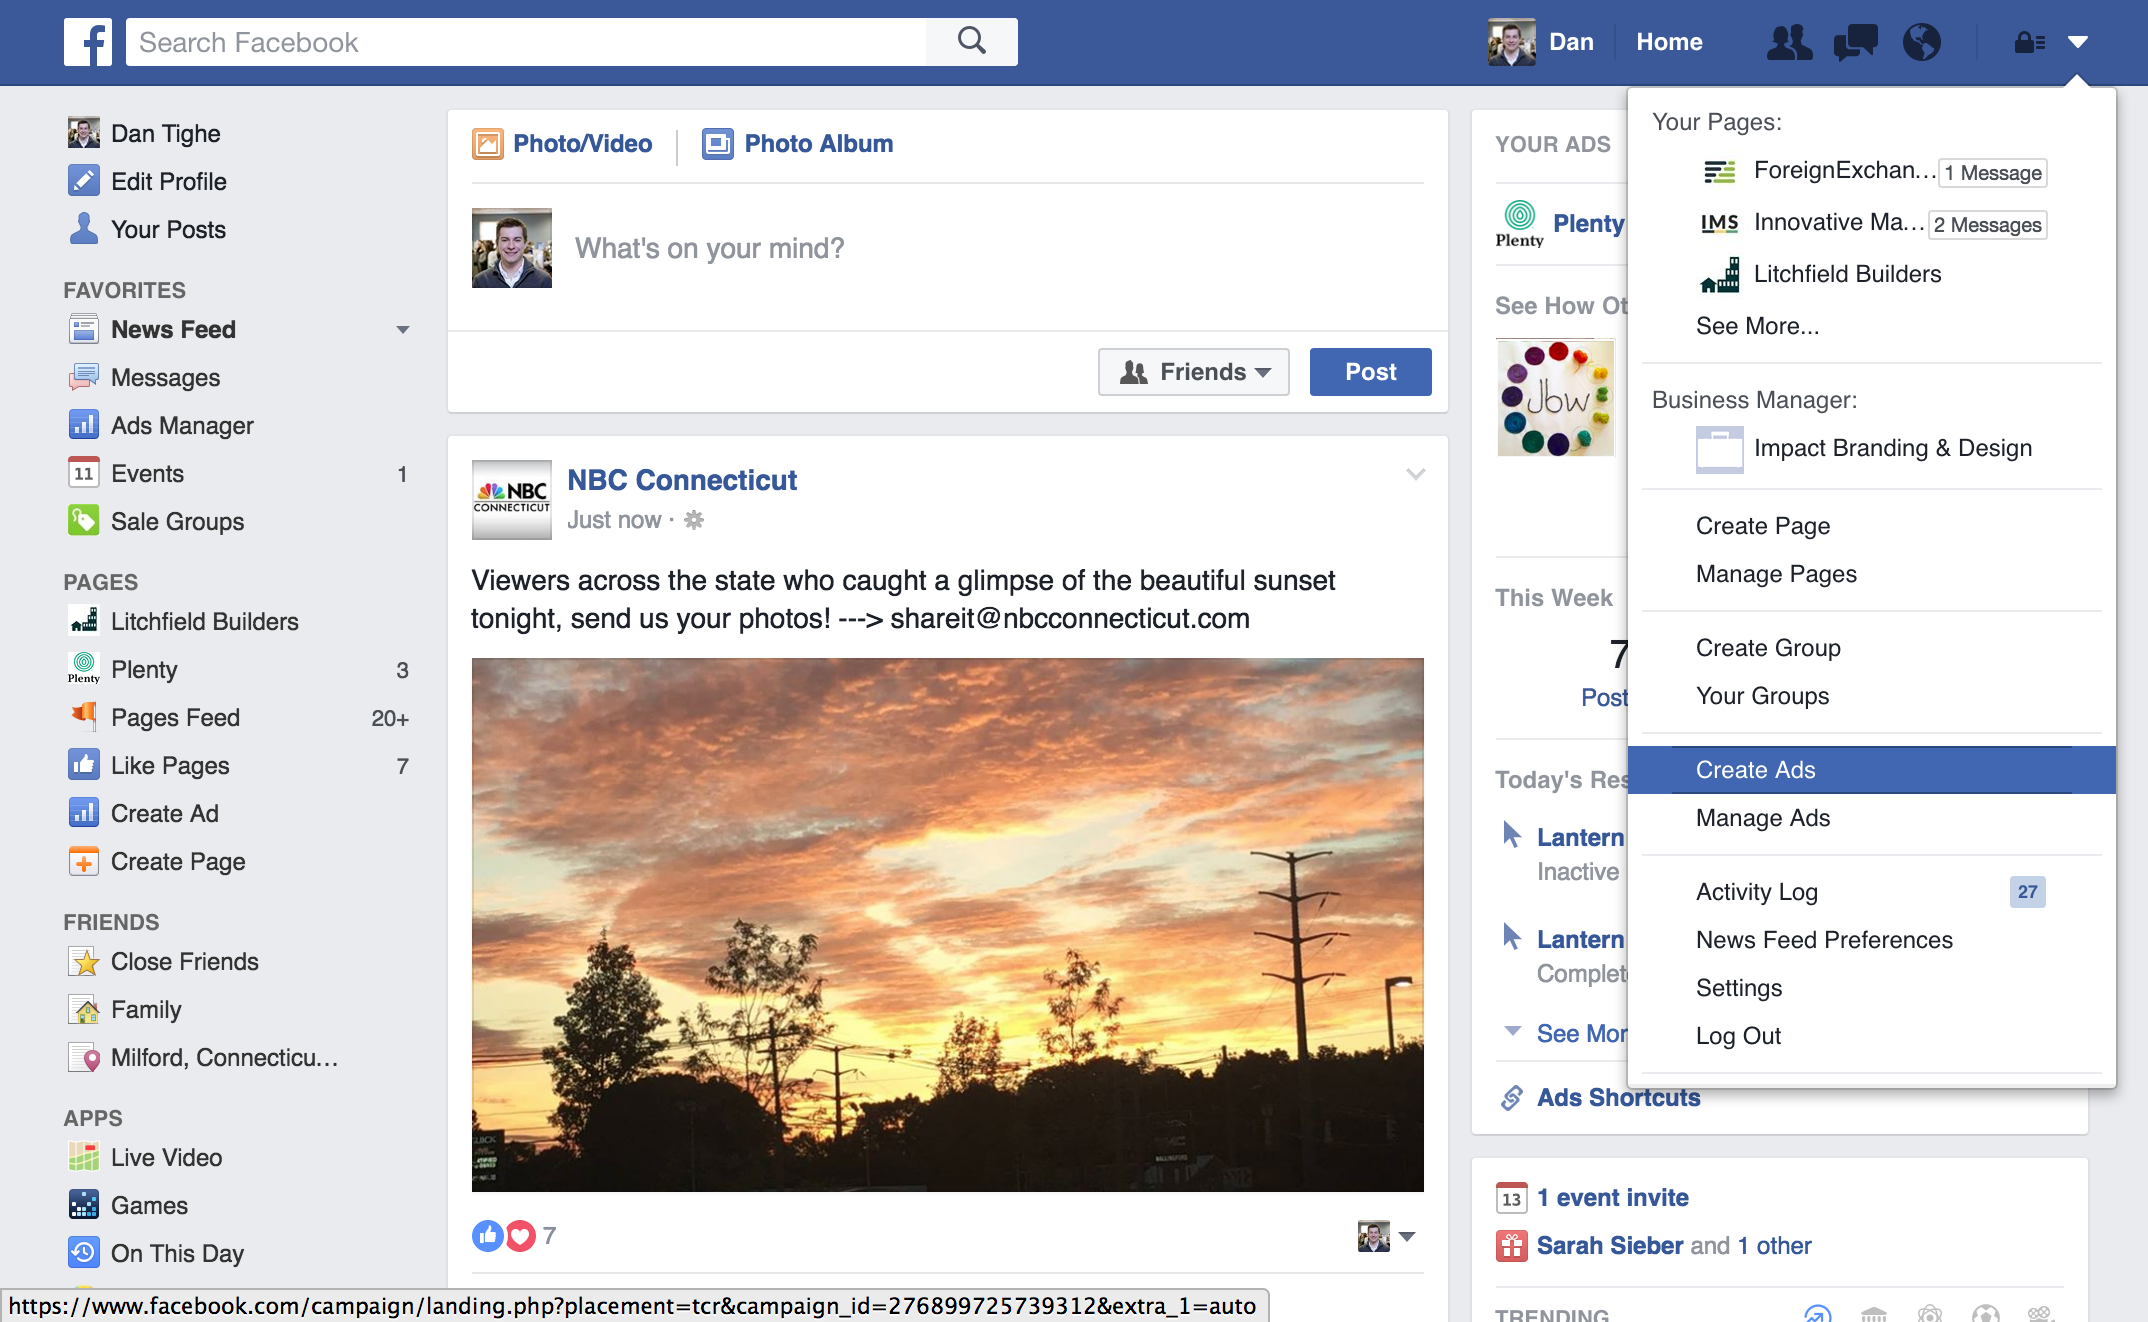
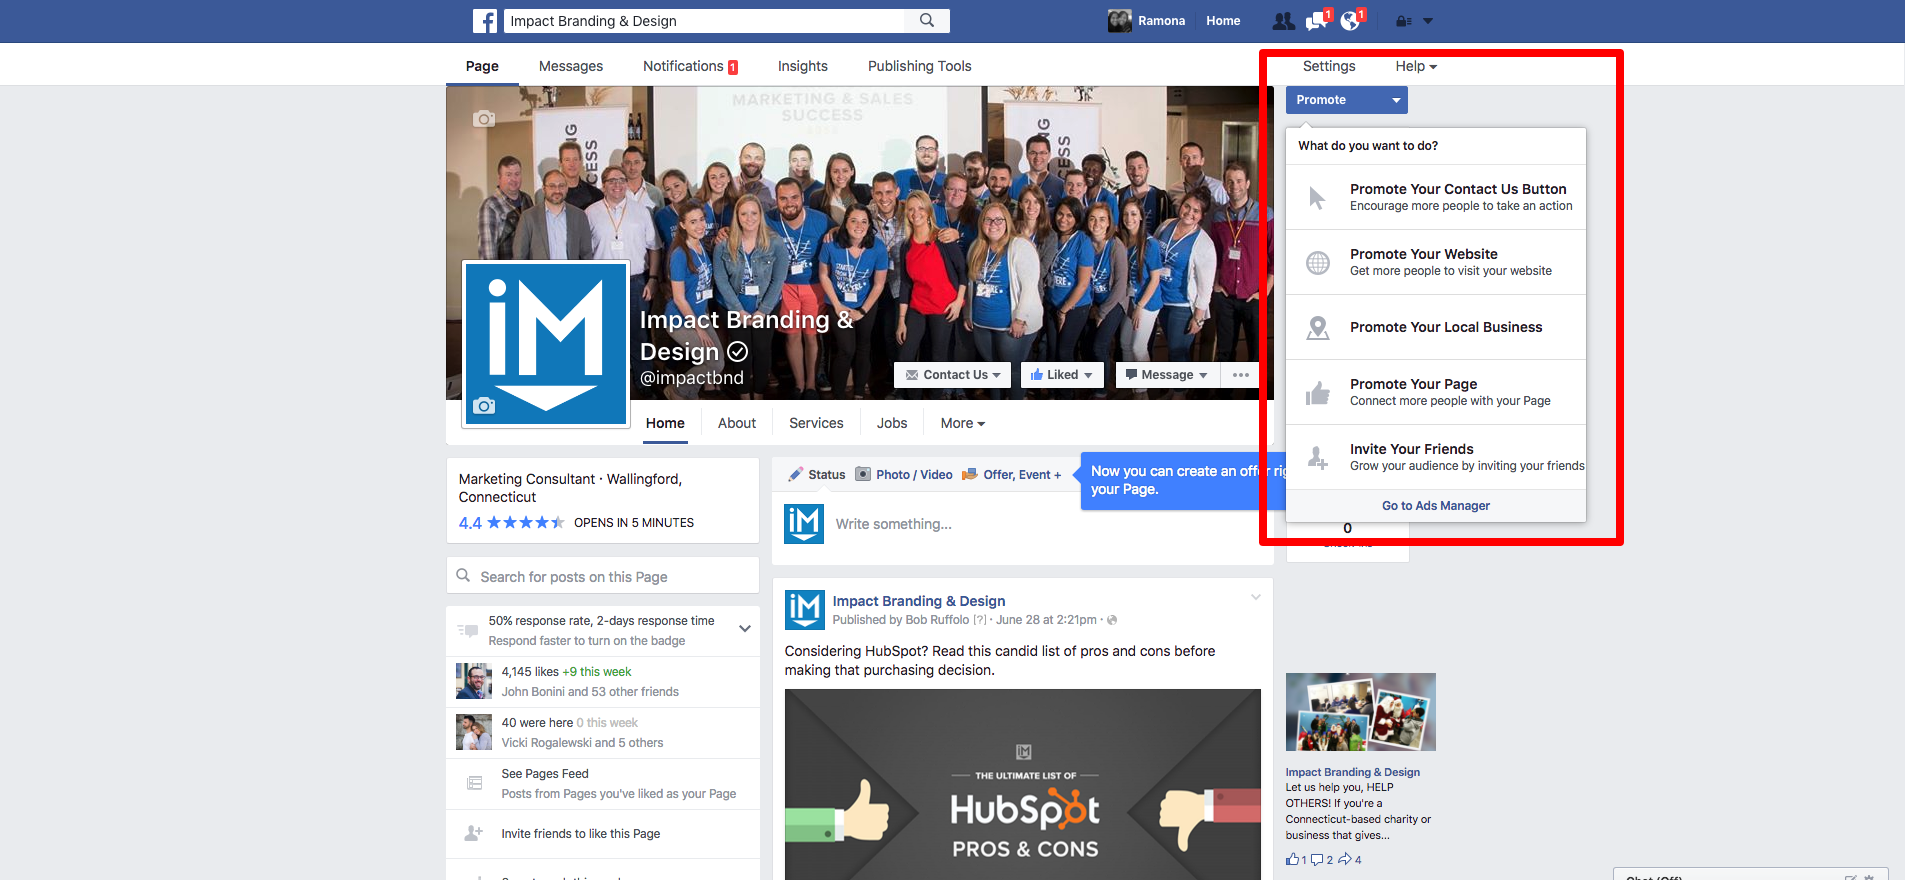
You will then be directed to the main page of the manager.
To get started, you will need to add what they call a Meta Pixel to your site. If this is your first time creating a pixel, Facebook has a great tutorial on how to get this set up correctly here.
2. Set Up Your Custom Audience
Once you have set up your Meta pixel, you can start creating your custom audience.
In the top left-hand corner of the ad manager, you will find a drop-down. Click "Audiences."
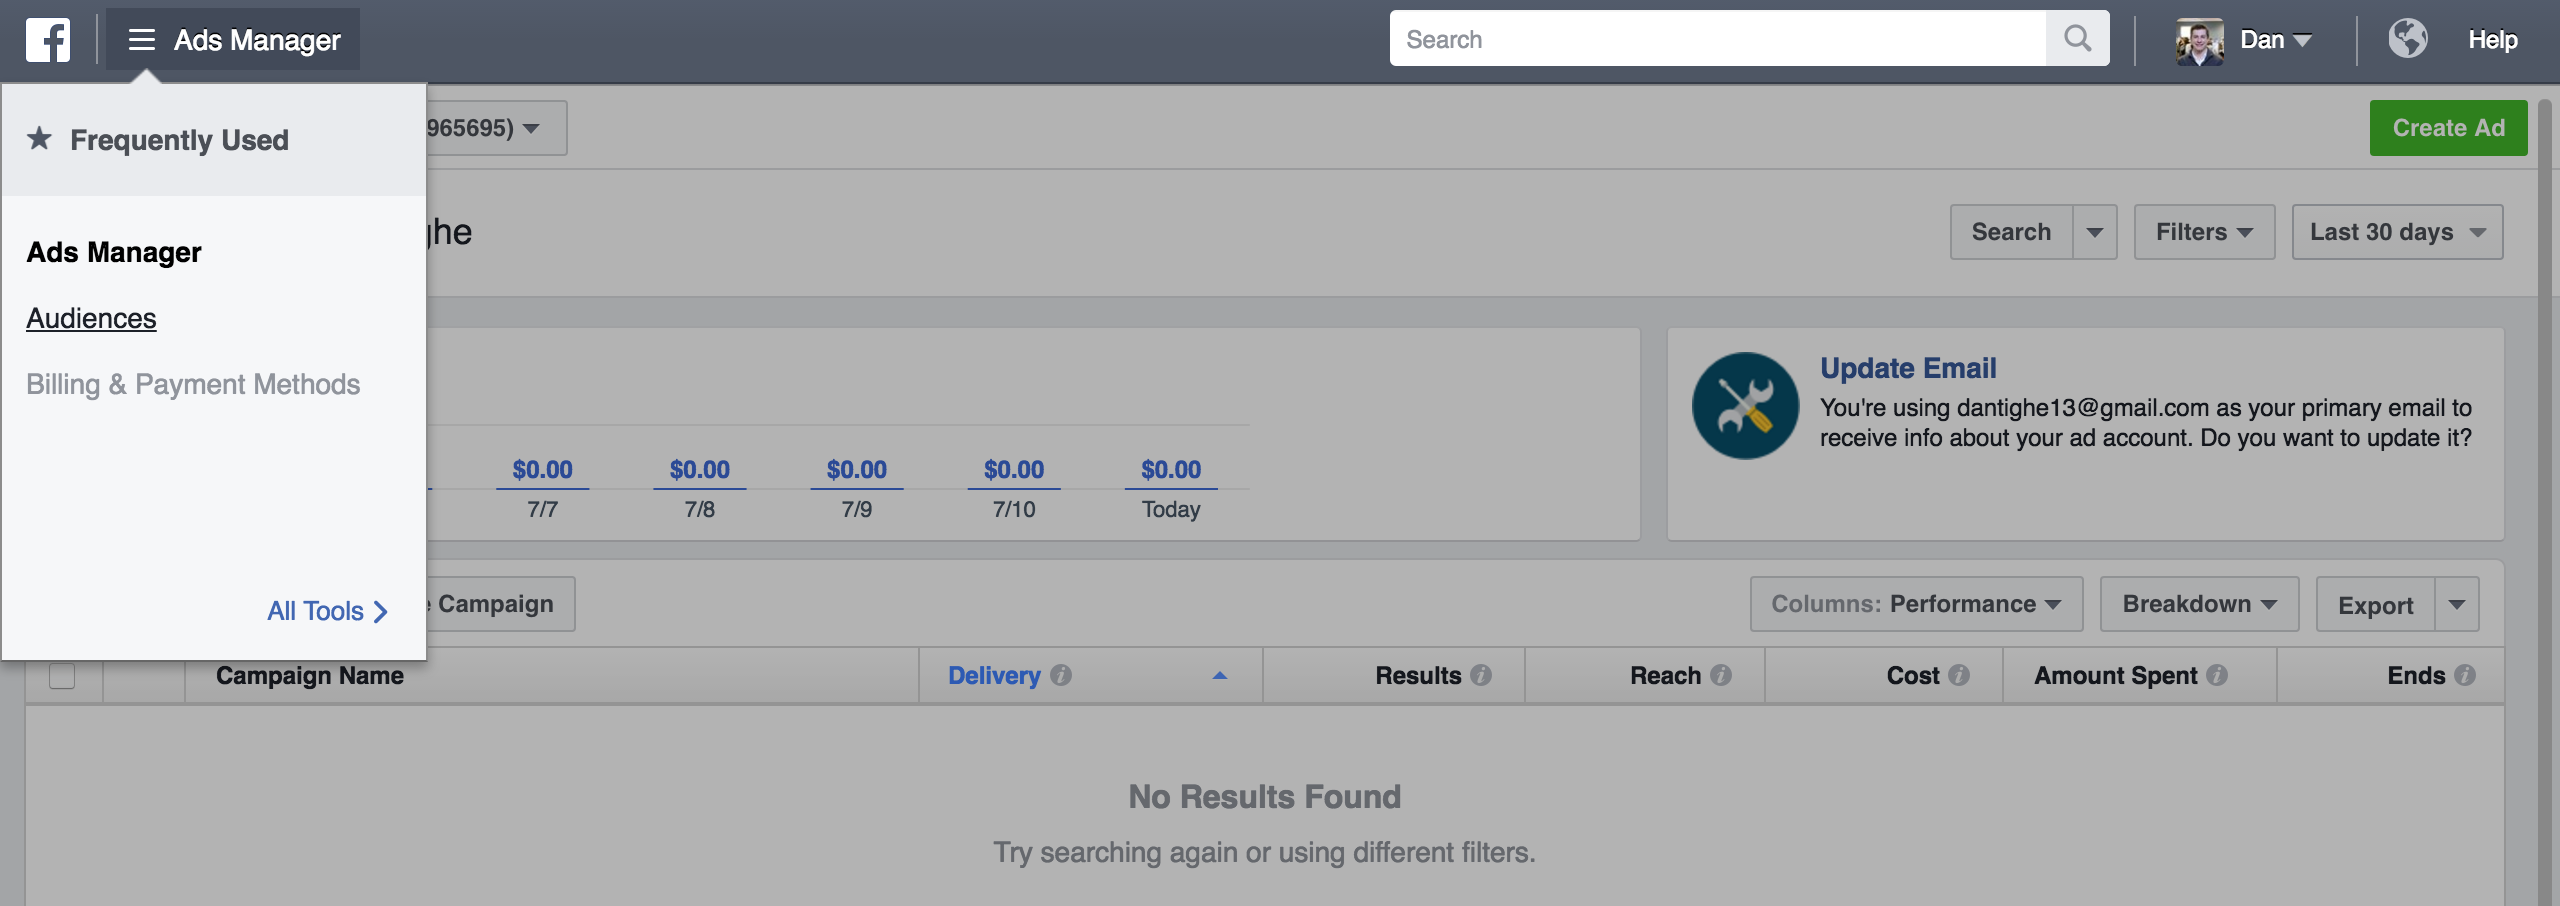
Here, you will want to create a Custom Audience based on website visits. You will then have the ability to create a custom audience based on the specific page of your site that you will want to target. This could be any page on your site (i.e. a certain product, a consultation form, an offer landing page, etc.)
When doing this, it’s important to remember the goal you have in mind of this campaign and the end action you want them to take.
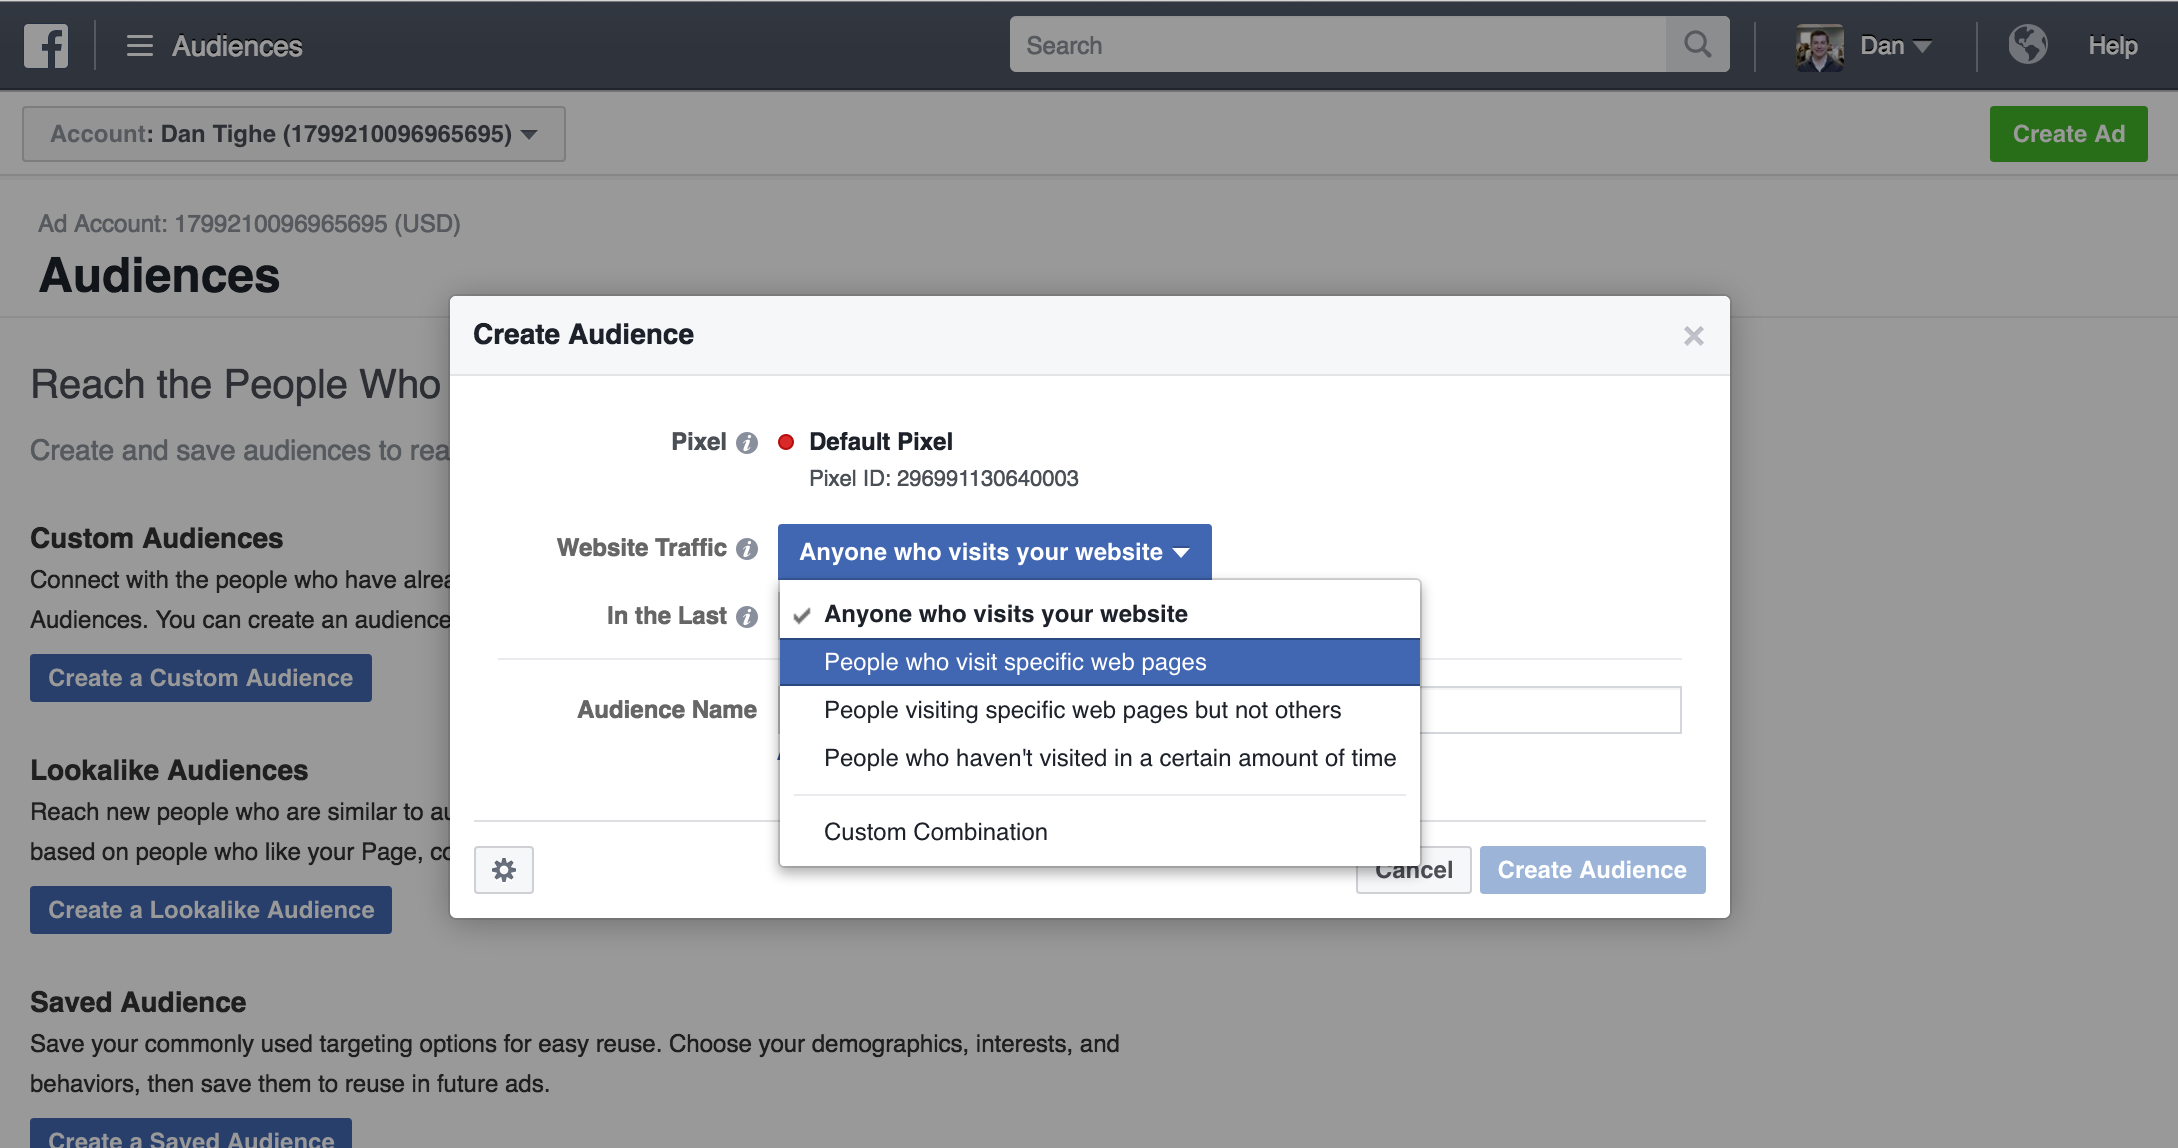
Once you place the URL that you would like to target and create your audience based on, Facebook will save this audience and begin to populate the page visitors.
This could take about 12 - 24 hours depending on your traffic to this page.
3. Set Up Your Campaign
Now that you have your audience created, you can begin setting up your actual Facebook remarketing campaign. In the campaign section, you will want to choose the “send people to your website” objective.
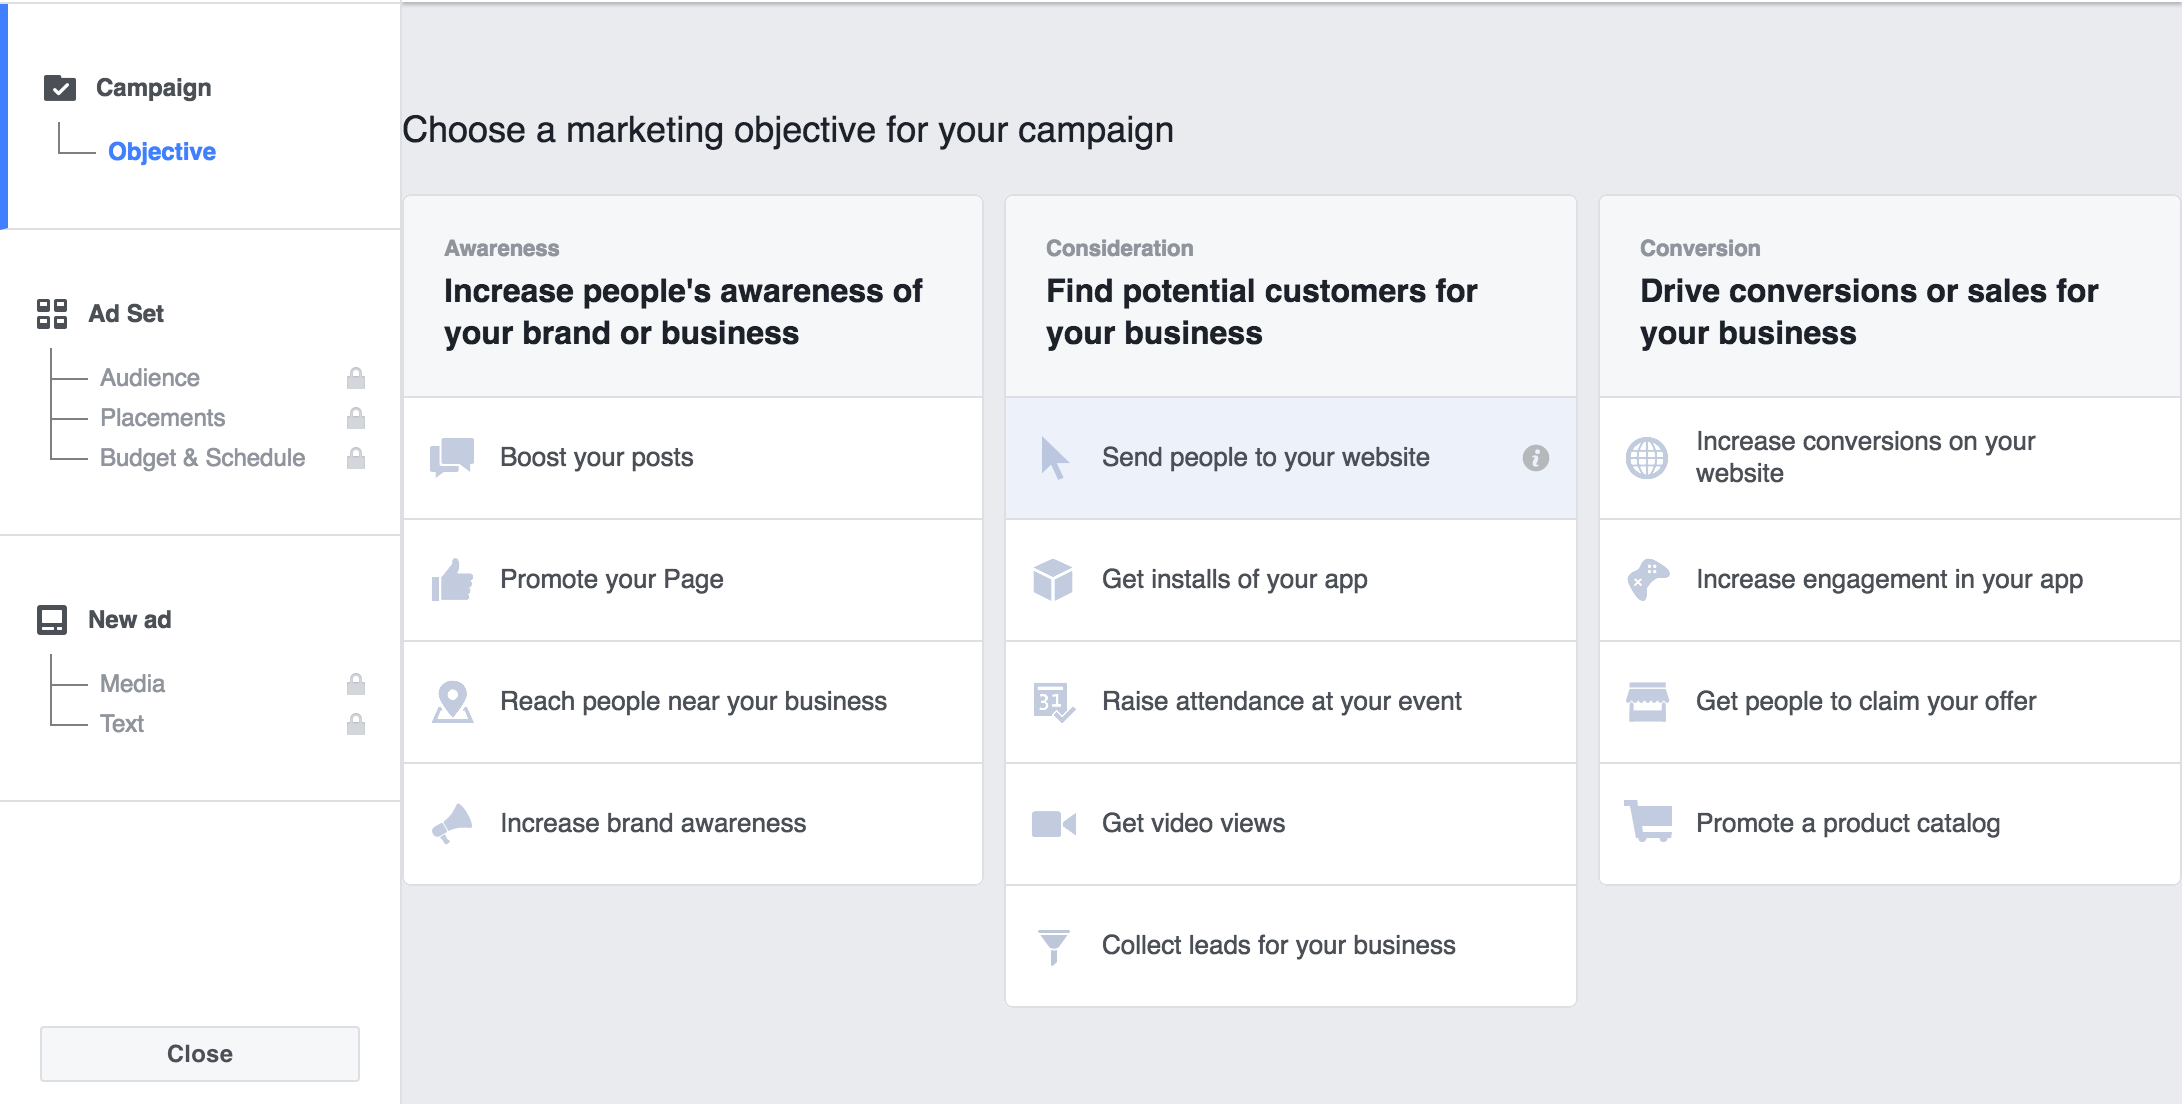
Once you choose this option you will be directed to creating your Ad Set where you will be able to customize your audience, placement, and the budget you want to allocate towards this campaign.

From here, you have the option to attach your custom audience which you will see appear in the dropdown.
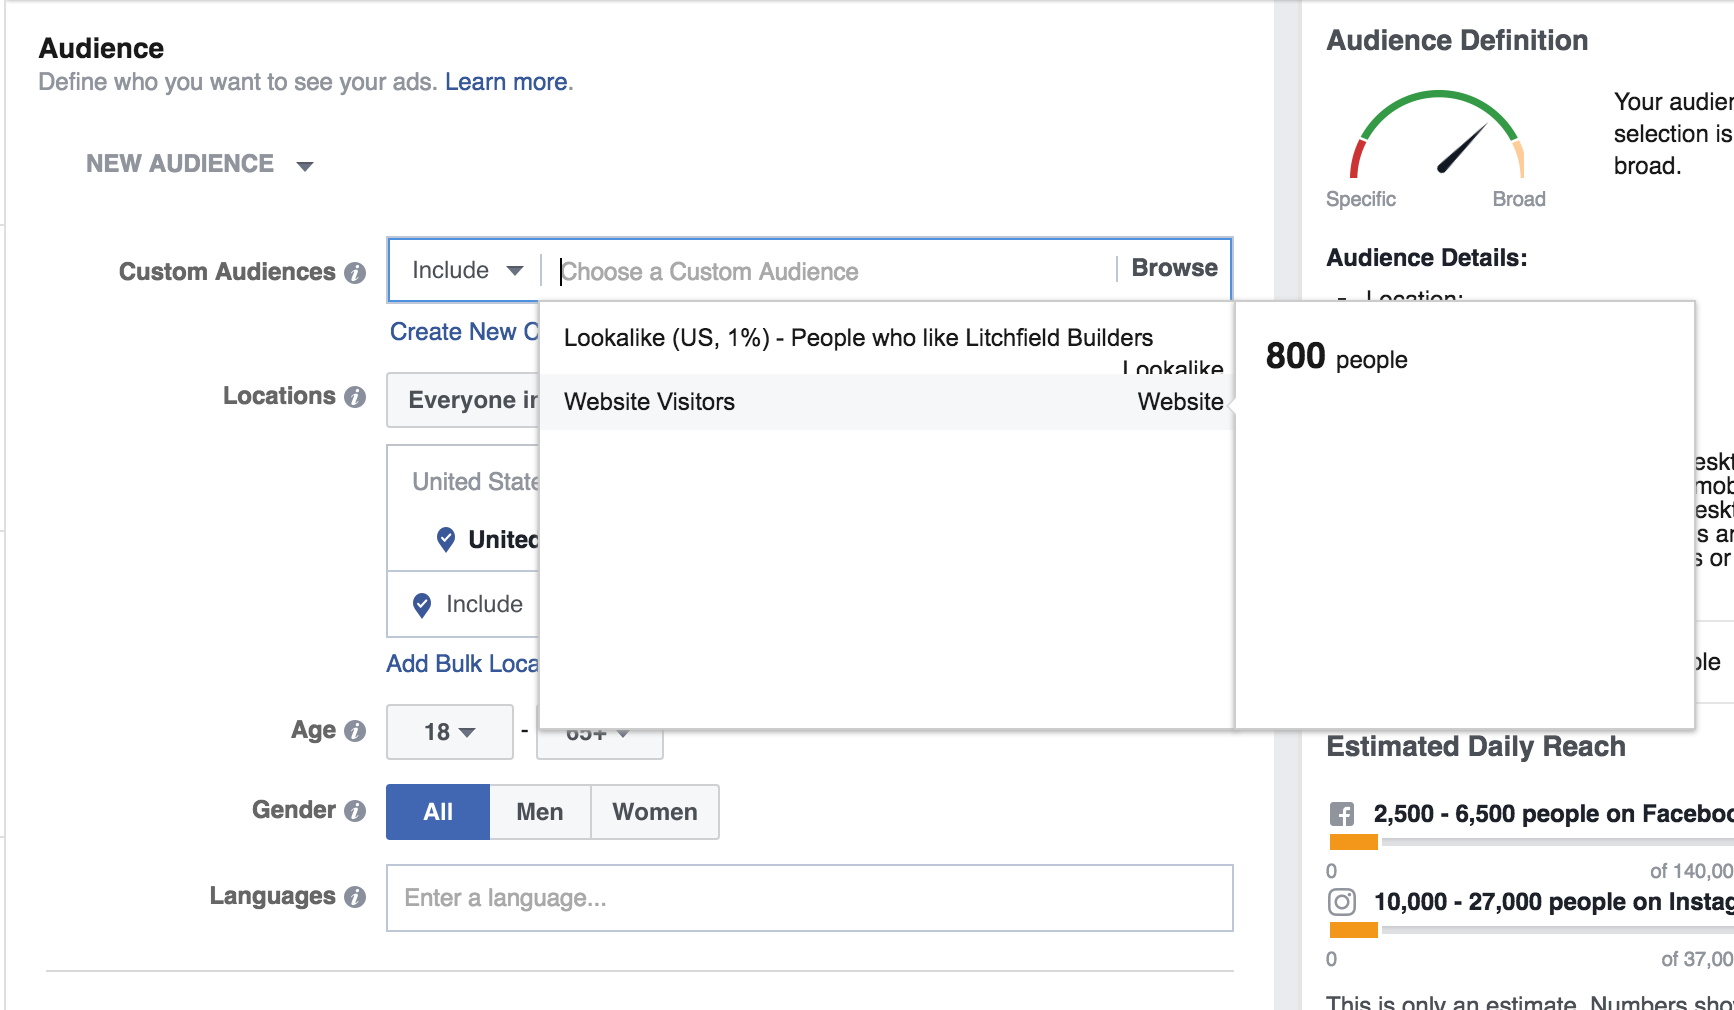
You can segment this list even further based on several factors including:
- Geographic location
- Age
- Gender
- Language
- Interests (Anything from job titles to favorite music bands)
You can get pretty specific with this, however, I would recommend seeing the type of visitors and leads you are generating the first week before you start really narrowing this down. Your audience should already be very targeted based on your buyer persona and you don’t want to miss out on any good opportunities.
4. Create Your Ads!
Finally, we’ve made it to the fun part!
Here, you will have the ability to fully customize your ads that your previous site visitors will see. The best part about this is how easy it is.
One of the most important aspects of your ad is the image, along with the headline. It’s best to keep your image simple, as it should almost appear naturally in a news feed.
Instead of spending an hour or so creating a custom graphic, use a nice appealing image. Images that users are expecting to see in their newsfeed might create more clicks. However, test out various types of ads with different types of images, headlines, and descriptions to see what works best with your audience.
I was hesitant to use a Facebook remarketing campaign at first, however, I have found this to be a great resource at our disposal.
Test this out with a week-long campaign and a small budget of $50 -$100. Your first campaign might not be a major success story, but learn from it and by continually tweaking your campaign/ads you will start seeing leads move down the Inbound Marketing Funnel!

Order Your Copy of Marcus Sheridan's New Book — Endless Customers!

