Subscribe now and get the latest podcast releases delivered straight to your inbox.
 I’m a HUGE fan of Zapier. We’ve been using it for the past few years at IMPACT and it’s enabled us to maximize our usage of applications like HubSpot, Slack, Google Calendar, Eventbrite, and much more.
Today, I’ll teach you to do the same (all without writing a line of code).
To use their own words, Zapier is “Easy automation for busy people. Zapier moves info between your web apps automatically, so you can focus on your most important work.” I think of it like a more mature version of the HubSpot Workflows tool.
At IMPACT, we’re using Zapier for a myriad of reasons. In fact, we trigger upwards of 100 Zaps per day. Examples of those include notifying team members that their on-call for our website’s
Today, however, we’re going to focus on the specific use cases for HubSpot. Specifically, we’re going to talk about how to get more out of your use of HubSpot with Zapier.
If you’re like me, you often find yourself stuck or on ideas.hubspot.com looking at specific features you wished existed with HubSpot (control over deals using workflows… I’m talking about you), but Zapier helps make many of those possible.
Using Zapier, we can control the data within HubSpot, add to the feature set, and connect it with other web applications. It’s a pretty kick-ass tool and we’ve managed to build quite a few workarounds to HubSpot’s limitations with it.
In this article, I’ll run through how to use Zapier with HubSpot including the Zapier basics, specific techniques to get the most out of Zapier with HubSpot, and some examples of ways you can leverage it.
So, let’s nerd out.
But fair warning -- This will get a bit technical so feel free to reach out to me by leaving a comment at any point. I love this stuff and I’m happy to help!
What is Zapier? (a.k.a. Zapier 101)
In product design, I’ve always found there’s a balance between flexibility and ease of use.
My go-to example is this:
Android phones are super flexible, allow for a great deal of customization, but not always the easiest to use. iPhones, on the other hand, are not very flexible, but they sure are easy to use.
Zapier seems to have struck a balance here. I wouldn’t go so far to say that Zapier is simple, but considering what you can do with it, it’s pretty damn close.
Now, I’m not going to come close to explaining Zapier in
Zapier is a web automation app. With Zapier you can build Zaps which can automate parts of your business or life.
A Zap is a blueprint for a task you want to do over and over. In words, a Zap looks like this: "When I get a new thing in A, do this other thing in B." The first part is the Trigger and the second part is the Action.
So, for example, a Zap may look something like this: Whenever a new submission is made on a form in HubSpot (trigger) send a tweet to your boss saying “Your marketer is awesome.” (action).
Now, the beauty of Zapier is almost all triggers (and many actions) pull information into your Zap, and you can use this information to enrich the actions you take. For example, the trigger based on a form fill in HubSpot pulls in a ton of information about that form and the contact that filled it out.
So, you could actually tweet your boss this, “Your marketer is awesome for getting [person’s name] to convert on [form’s name].”
I probably wouldn’t recommend doing that for a handful of reasons, but I hope it illustrates the point!
Getting more advanced with Zapier
So now we know you can pull data in based on a trigger and that we can take action on it with different applications. Awesome.
You can also manipulate that data or filter
Now, like I mentioned before, that only cracks the surface of the tool’s capability. In fact, I’m learning some new trick every time I use it.
If you’re interested in learning more, I highly recommend diving into their help documentation.
Using Zapier with HubSpot
Let’s talk Zapier & HubSpot; That’s why we’re here after all.
Zapier has two apps for HubSpot: HubSpot and HubSpot CRM. As you can probably guess, the HubSpot app handles functions around the core marketing functionality of HubSpot, while HubSpot CRM controls contacts, companies, and deal records.
The first things worth checking out are all the HubSpot triggers built into Zapier.
I’m going to list off the triggers for HubSpot:
- New COS Blog Article: Triggered every time a new article is added to your HubSpot COS blog.
- New Calendar Task: Triggers When a new Calendar Task is created.
- New Social Media Message: Triggered when a message is posted from HubSpot in a selected social media channel.
- New Contact in List: Triggered every time a contact is added to the specified list.
- New Form Submission: Triggered every time a new form submission occurs.
- New Contact: Triggered every time a new contact is created in HubSpot.
- New Contact Property Change: Triggered every time a specified property is updated on any contact. This will also be triggered when a contact is created with this property.
Here are the triggers for the CRM:
- New Deal: Triggers when a new deal is created.
- New Contact: Triggered every time a new contact is created in HubSpot.
- New Contact Property Change: Triggered every time a specified property is updated on any contact. This will also be triggered when a contact is created with this property.
- New Deal in Stage: Triggers when a new deal enters a stage.
- New Company: Triggers when a new company is created.
Next, let’s take a look at the actions for HubSpot:
- Add Contact to Workflow: Enroll a contact in a specific workflow.
- Create Calendar Task: Creates a new Calendar Task.
- Create Social Media Message: Post a message on one of your social media channels.
- Create or Update Contact: Create a new contact or update an existing contact based on email address.
- New Form Submission: Submits data into a selected HubSpot form.
- Add Contact to List: Add a contact to a specific list.
- Create COS Blog Post: Create a blog post in your Hubspot COS blog.
- New Enterprise Event: This action fires a custom enterprise event. (HubSpot Enterprise customers only).
- Find Contact: Finds an existing contact.
And the actions for HubSpot CRM:
- Create Deal: Creates a new deal.
- Update Deal: Updates an existing deal.
- Create Company: Creates a new company.
- Create or Update Contact: Create a new contact or update an existing contact based on email address.
- Update Company: Updates an existing company.
- Find Contact: Finds an existing contact.
- Find Company: Finds an existing company.
- Find Deal: Finds an existing Deal. Optionally, create one if none are found.
A lot, right? So, yea… You can do quite a bit and these are only the actions regarding HubSpot.
You may have noticed there is some overlap between the actions for HubSpot and HubSpot CRM. I haven’t noticed a difference in using one versus the other and I imagine they’re there to help customers that are using one product but not the other.
Tricks to Using HubSpot with Zapier
Adding to the basics of Zapier, let's talk about some of the specifics of using HubSpot and Zapier together.
Using Zapier With HubSpot Workflows
As if the list of triggers above wasn’t enough, you can use this little trick to trigger Zapier as a step in a workflow.
We actually use this a lot because it combines the power of HubSpot’s workflow enrollment criteria and branching logic with
This is a key ingredient in doing calculated properties in HubSpot with Zapier, but more on that in a bit.
HubSpot Workflows have the ability to trigger webhooks. Webhooks are a way for web apps to transmit information between each other. Basically, the sending app (in this case, HubSpot) will “POST” information to a specific URL. The receiving app (Zapier) will be monitoring that URL for information sent to it.
So here’s how you set that up:
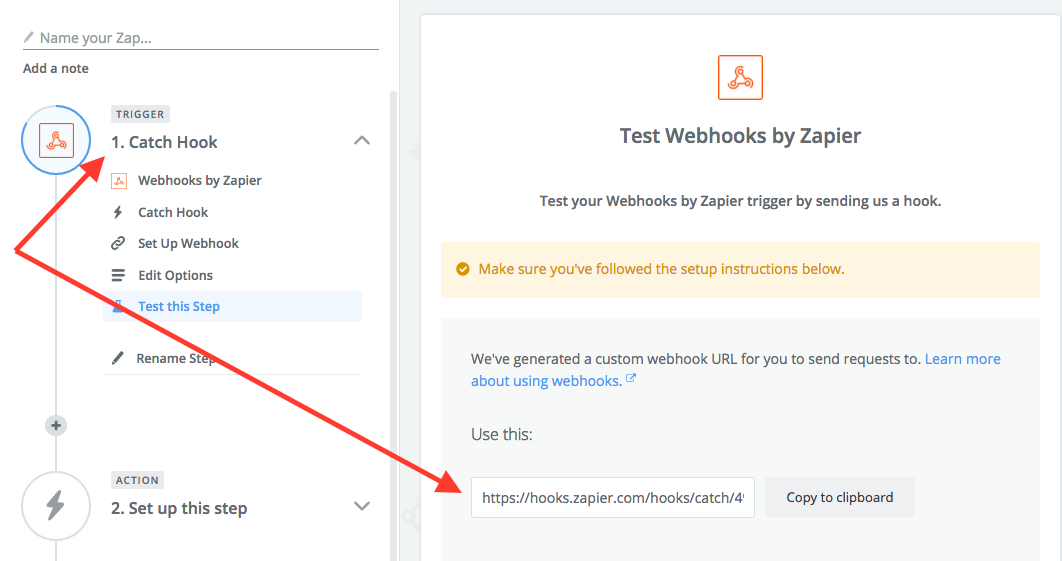
- In Zapier, create a new Zap and set the trigger to “Webhooks by Zapier.” Choose the “Catch Hook” option and hit Continue twice. You should now see
a URL you can copy. Grab that sucker.![HubSpot-Zapier-tut1.png]()
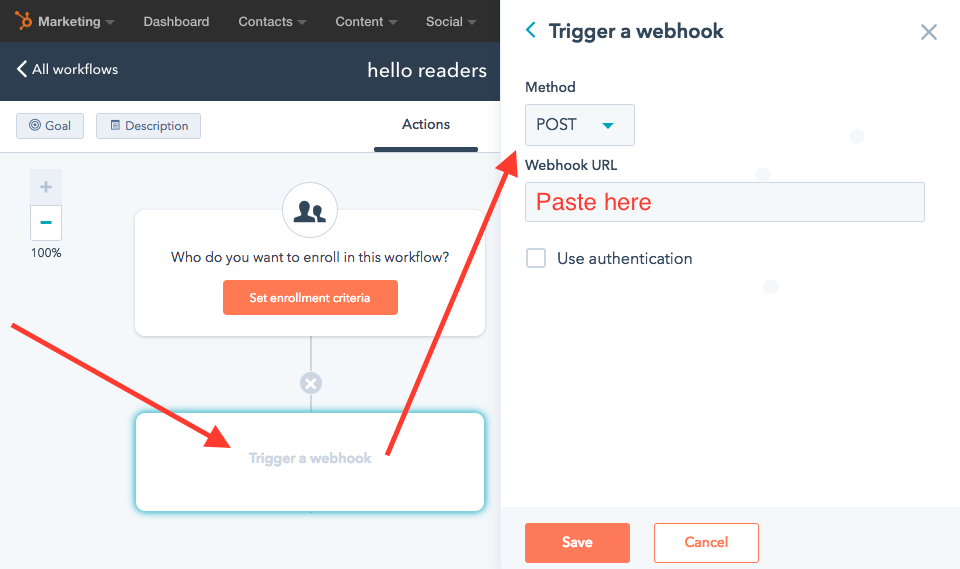
- In HubSpot Workflows, set the action of your workflow to “Trigger a Webhook.” In the options for that, post the URL you got from Zapier, set the action to POST and don’t check the authentication box.
![HubSpot-Zapier-tut2.png]()
- Now, this is the tricky part. Zapier needs to test your connecting with HubSpot and the only way to do this is by triggering your workflow. I typically do this by using myself as a test contact. Trigger your workflow and then head over to Zapier and click “OK, I did this.” Zapier should then receive your webhook.
The awesome thing about doing this is all the information about your workflow gets passed into Zapier. That includes the basics on workflow trigger and basic information on any associated contact, company
Enriching Contact Data with HubSpot and Zapier
A lot of times, you’ll want access to a contact’s entire HubSpot profile in your Zap, but some triggers only pull in basic information surrounding them. For example, if you have a Workflow that triggers a Zap in HubSpot, you’ll get the contact’s information and information around the enrollment criteria.
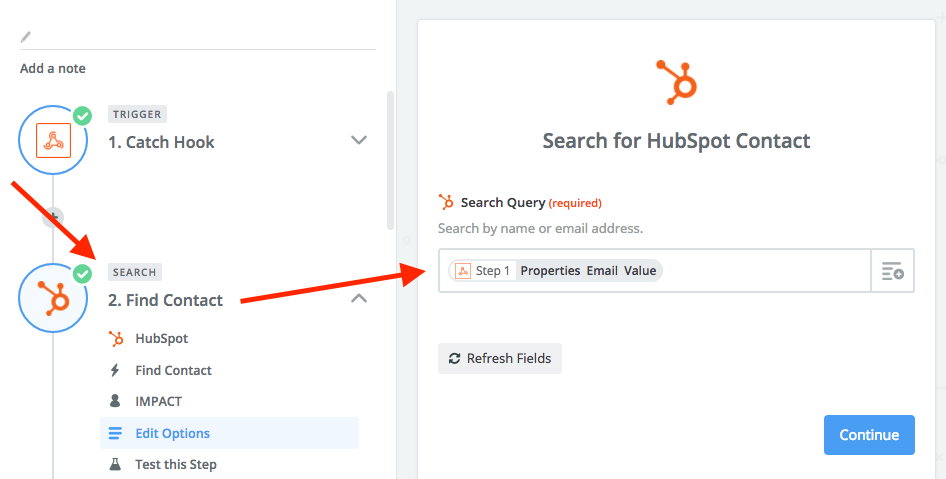
Luckily, you can grab a contact's profile with the Find Contact action.
Simply map “email field” from your trigger (which contains the email of the person who triggered your Zap) to the input of the “Find Contact” action and HubSpot will return their entire contact profile.

This ability has a few hidden advantages.
For starters, you get access to a number of hidden fields that are not accessible in your HubSpot Portal. These fields are often technical, but can contain important information like the contact’s unique HubSpot ID (also known as VID) which can be used in this format to create a direct link to their contact profile:
https://app.hubspot.com/contacts/YourHubSpotPortalID/contact/VID/
Quick side
Another great advantage of using “Find Contact” to enrich your contact data is that it will not only return the current value for any contact
Unlike HubSpot’s workflow tool which doesn’t allow you to use value history (except for the “has ever been” value selector), this gives you the ability to build extremely powerful automation based on a contact’s entire interaction with your organization, not just their more recent actions.
Lastly, if you’re using a service like Clearbit or FullContact for better contact enrichment in your CRM, you can also ping those services with an action to pull even more information into your Zaps.
I told you we were going to nerd out. Let’s talk about some of the cool things you do with all this new knowledge!
Examples of Getting the Most Out of HubSpot with Zapier
Now that we know how to use Zapier to perform certain functions, let’s talk through some of my favorite examples of how you use it with HubSpot.
These are just some of the integrations and enrichments we have personally used, but there are thousands more that even we have yet to explore. Your imagination (and supported Zapier integrations) are the limit.
HubSpot + Slack (or other team chat software) + Zapier
One of the things we used to struggle with using HubSpot was getting information out of the platform in real-time. With marketing becoming a more and more
For example, when someone fills out our consultation request form, we pride ourselves in responding in less than five minutes. Try it; I dare you...
The typical way people would handle responding to form fills is with email notifications, but there are several issues with this.
For most of the people I work with, Email has become very difficult to keep up with, and it’s also a major distraction. Therefore, we limit how often we check it.
Also, email wasn’t built to facilitate multiple people discussing a topic in real-time. If the primary person on call didn’t see the email or isn’t available, there isn’t an instant way to ask a teammate to cover for them.
We fixed both of those issues by having Zapier send relevant HubSpot notifications to a Slack Channel. This allows us to get all the relevant team members in a forum where they could discuss notifications in real-time and tag someone else in if needed.

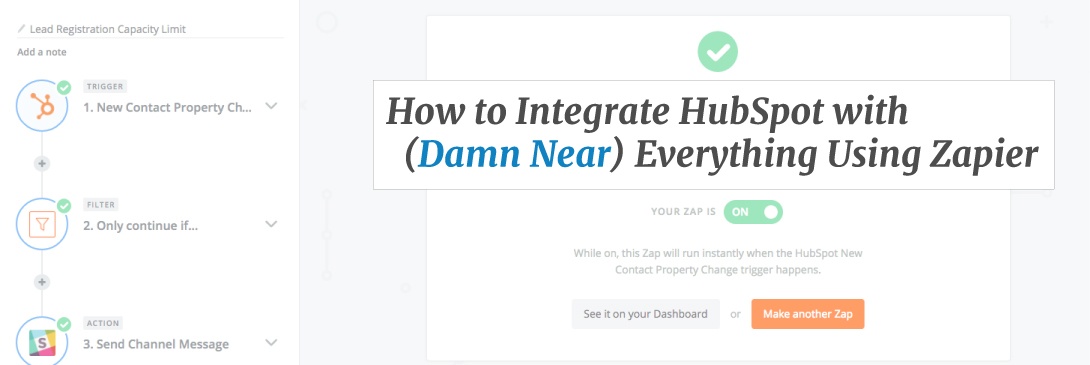
The perks of this integration don’t just stop at form fills, though. We’ve also used it to trigger notifications on particular contact property changes that usually indicate qualification or intent to buy. It’s helped streamline our follow-up and make it a more all-inclusive process.
By the way, this works with several other live chat softwares, too.
How to do Calculated Fields in the HubSpot CRM
I’ll say this upfront: I’m a little bitter about this one.
Calculated fields should be a part of the HubSpot CRM’s core functionality (hopefully, we’ll see an update soon) and there's a good chance that you’re reading this blog article because you’re looking to solve for this.
So, I’ll get into the specifics on how to accomplish this.
Here’s how to calculate fields in the HubSpot CRM:
We need to trigger this Zap when ALL of the properties that you want to calculate are filled out.
If you were adding two numbers, you would create a HubSpot workflow that’s enrollment criteria was those two properties being known. From there, you would use the webhook technique above to trigger a Zap.
Your Zap is super simple. Because your webhook will pass all the properties that triggered your workflow in HubSpot into Zapier, all you need to do is apply your calculation and then update
We’ve had success doing calculations in Zapier using two different actions (although I’m sure there are more ways).
The
Note: This paragraph is for super nerds -- For highly specific scenarios, you can leverage the Javascript code block which allows you to write JavaScript functions and methods. We typically use this to change Unix timestamps into legible dates.
In order to pass your updated property back into HubSpot, you use the Create or Update Contact action. You’ll find the email address you need in the webhook you got from HubSpot.
Update HubSpot Deals with Workflows
When I said that we had experience doing all of these things, I lied. I’m deciding now, as I write this, to add this last example in because I know it’ll help a large number of people.
In the introduction, I mentioned workflows couldn’t control deals and link to the feature request.
Well, as someone pointed out in the comment section of that request, recent updates to HubSpot’s Zapier actions now allow us to do update deals with workflows.
Updating deals with workflows follows the same pattern as above:
Use workflows to trigger a webhook and use that webhook to trigger a Zap, but here’s where the updates helped.
Before now (March 2017), there was no action for updating deals via Zapier. Now there is, so we can use that action to update the associated deal (or any deal for that matter).
I’m a bit bemused that these updates were made to the Zapier actions (which are built by HubSpot) but the native workflow tool is still neglected.
Zapier Makes HubSpot Much More Powerful
If you’ve made it this far, I’d hope the gears are turning in your head in ways that you can make Zapier work for you. Beyond HubSpot, we’re using the tool to connect and augment most of the tools we’re using and quite honestly, we need it.
If you’re ever wondering if something is possible, be sure to see if Zapier can solve for it. We’ve found that it often can.
Lastly, I understand that this article isn’t the most digestible. If you have any questions, you can reach me by commenting below. I’ll follow up in the comments and by email (if applicable).
Happy connecting,
Kyle


