Subscribe now and get the latest podcast releases delivered straight to your inbox.
You’re curious about this newfangled HubSpot thing you heard about — so you decide you might as well check it out and give it a try. After all, it’s free to start, right?!
Yes! And while HubSpot’s free CRM is mostly meant to be a “try before you buy” solution, there is certainly a lot you can do with it before ever needing to upgrade.
If you ever do decide to upgrade to a paid version, or are serious about truly getting the most from the free version, there are a few things you’ll want to make sure you do when you’re setting up your free portal to ensure you’re able to scale.
The basics
HubSpot has some great resources on getting started with the free CRM, but depending on how you’re looking to use the tools they may not all be necessary. Let’s take a look at the top four basic setup items we recommend for anyone getting started with the platform.
1. Connect your email (Gmail or Outlook 365)
One of the major benefits of the free CRM is the ability to log and track your email correspondence with your contacts. When you connect your email via HubSpot’s Sales Extension, you’ll be able to email contacts directly from their contact record in HubSpot, as well as log emails that you’re sending from your Gmail or Outlook inbox.
These features give you insight into when contacts are opening your emails or clicking on links you’ve sent them, as well as keep track of all of your one-on-one email communication with a contact in one place - their HubSpot contact record.
To connect your email, simply follow the steps in this knowledge base article.
2. Set up and customize your deal pipeline
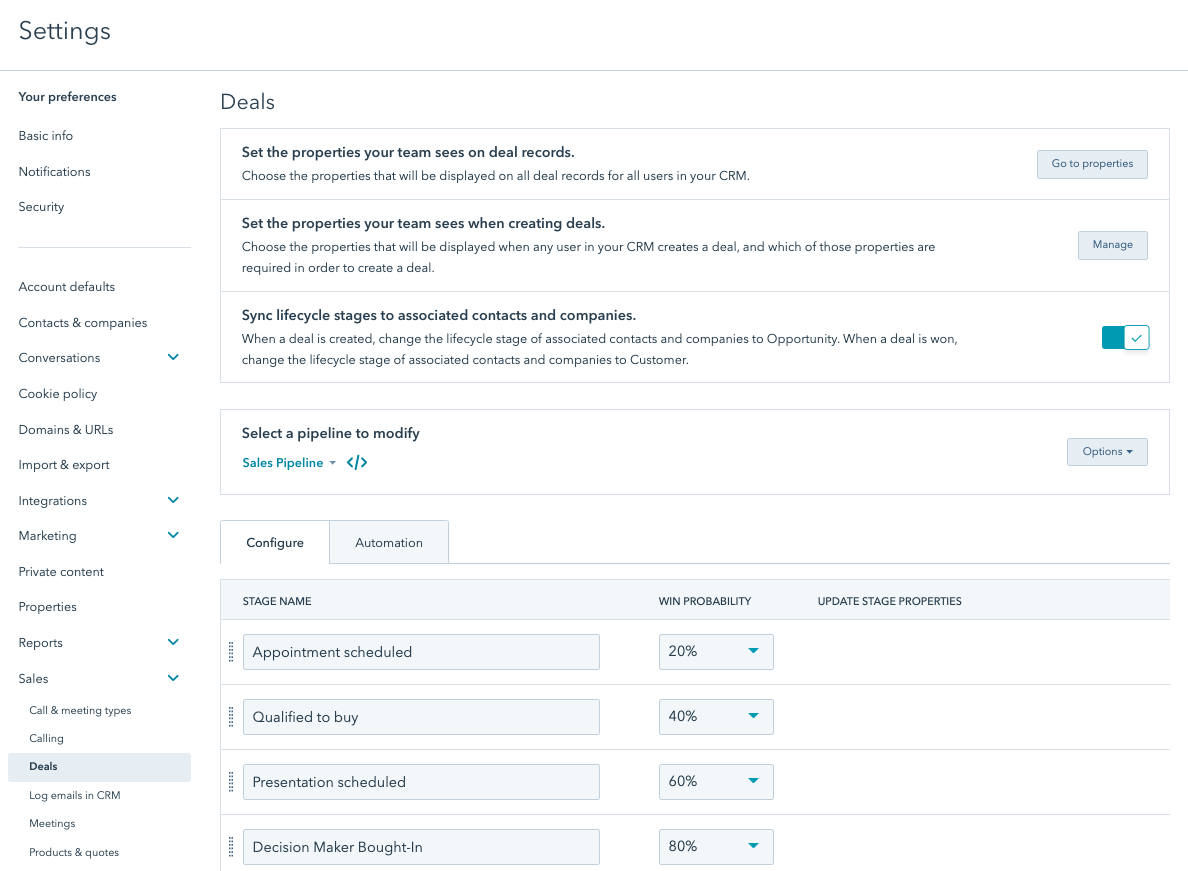
If you’re going to be using the CRM to track your deals, you’ll want to make sure you customize your pipeline right away. With the free platform, you’re able to set up one pipeline with customized deal stages for each part of your sales process.
It’s also important to get your deal stages right the first time when it comes to reporting. If you end up having to add or remove deal stages later on, your data will start to get messy and you may essentially have to start from scratch with your reporting.
Navigate to Settings > Sales > Deals and you’ll see a default pipeline already setup for you. You can delete any of the default stages, or simply rename them. You also have the ability to set the Win Probability for each deal stage so you can use HubSpot’s default forecasting report.

The important thing to consider here is what is and isn’t important for you to track as a deal stage. You may technically have 20 steps in your sales process, but is it necessary to track every single one, or are there six or seven major ones?
Having superfluous deal stages can make it easy for reps to skip stages when moving deals, which can potentially skew your reporting later on.
Learn more about setting up your pipeline and deal stages here.
3. Import your contacts and/or deals — but be careful!
If you’ve already got a database of contacts and/or deals and you want to get them into HubSpot, you have the ability to import them via a spreadsheet or CSV file.
HubSpot walks you through how to import your contacts and deals here. But wait! Before you do, there a few important things to consider:
- Is the database you’re importing actually clean? Now is a great time to start fresh — so make sure you’re only bringing in contacts you’re actively engaging with or want to in the future. We recommend running your list through a tool like NeverBounce before doing an import to make sure any old/dead email addresses get filtered out.
- Do you plan on using a paid version of the Marketing Hub anytime in the near future? While you have the ability to import and store as many contacts as you’d like into the CRM, if you ever upgrade to a paid version of the Marketing Hub, you’ll have to pay per 1,000 contacts in your database (bonus tip: another reason keep your lists and database clean as you go!).
- You may have specific data points you want to import with your contacts or deals. If this is the case, you’ll want to create those custom properties before you do your import. More to come on this in #5!
4. Set up your Meetings tool
This is an easy one, but it often gets overlooked with the other shiny new toys in your shiny new portal! The Meetings tool allows you to connect your Google or Office 365 calendar to HubSpot and create a link for contacts to book time on your calendar.
You have the ability to customize when the meetings link shows you are available, as well as if you want to have buffer time in between your meetings, or a minimum notice time for when people book meetings with you.
If you’ve never used a meeting scheduling tool like this before, and often go back and forth with your contacts trying to find times that work for meetings, this tool will be the ultimate time-saver!
See the step-by-step setup process here.
The good stuff
If you start with the four basic setup items above, you’ll have a solid foundation for your CRM. But if you really want to get the most out of the platform, the next four setup items are where it really gets good.
5. Create custom properties for contacts and deals
Every company or individual that uses a CRM will have different pieces of information they want to keep track of on their contacts and their deals. Thankfully, HubSpot allows you to customize the platform to do just that — and these pieces of information are called custom properties.
Let’s say you want to track whether your contacts are a Prospect, Vendor, Partner, or Client. You can create a custom contact property with those four items in a dropdown.
These custom properties are the magic that allows you to segment your database in the way that makes sense for your business, as well as do detailed and customized reporting (if you end up at the Professional or Enterprise level of the platform!).
Here’s a walkthrough on how to set these up.
6. Create saved filters for maximum efficiency
Once you’ve got contacts and/or deals being housed in your free CRM, you need to make sure you’re able to navigate to the ones that are most important to you quickly and easily. Fortunately, HubSpot gives you the ability to create saved filters in your contacts and deals view.
You can create filtered views for any default or custom contact and deal properties you are using. You can also use multiple filters at once to really focus in on the contacts or deals you need to see. Once you’ve created a filter you want to use again, you can save it and name it to access it quickly.
Here’s the step-by-step process of how to do that.
7. Use your 5 templates, snippets, and documents
One of HubSpot’s most popular feature-sets are what we like to call their sales efficiency tools — specifically, sales email templates, snippets, and documents.
Sales templates in HubSpot allow you to stop copying and pasting the same email copy and subject lines over and over again. Similarly, snippets are blocks of text (up to 2500 characters) that allow you to not have to copy and paste the same things constantly.
The Documents tool in HubSpot is a document-viewer (for text documents and PDFs) that allows you to track who is viewing your document and when. It’s great for things like standard pitch decks or other sales resources that you send to prospects regularly.
With the free CRM, you are able to create five of each of these assets, and you may be surprised at how much easier they make your day-to-day. But be careful! Once you start creating them, you may get frustrated that you can only create five, which leads us to...
8. Prepare for the possibility of upgrading
While HubSpot’s free tools may be exactly what you need right now, if you are planning on your company growing in the near future, you’ll get to a point where you are hitting the limitations of the free tools and are faced with the decision of whether to upgrade to a paid version of HubSpot or not.
HubSpot offers three subscription levels for each of their Hubs (Marketing, Sales, and Service) — Starter, Professional, and Enterprise. Understanding what each level of each of those Hubs offers will allow you to make smart decisions, only paying for the functionality that you really need.
Lucky for you, we’ve got a full breakdown of exactly that to get you started!
In conclusion
As mentioned, HubSpot has a ton of resources in their Knowledge Base on how and what you can set up in your free CRM. Take the time to complete these 8 items, then take a peek through all of HubSpot’s suggested setup items to understand what’s really important for you and your business. And then, get after it!
And if you need help getting going with HubSpot, we’re here for you!
Happy HubSpotting!


Order Your Copy of Marcus Sheridan's New Book — Endless Customers!

