Shhh… I want to tell you guys a secret.
Don’t tell anyone, but I’m not a marketer. Or at least I wasn’t.
I started my career in the nonprofit world doing campus ministry, and after a few years, I realized that, while I loved my job, I loved it most when I got to do marketing activities for the organization. It was like a lightbulb going on right above my head and the rest is history.
As I dove deep into the world of inbound marketing, I quickly realized that HubSpot is the major leader of all things inbound (I mean that’s what their conference is called, am I right?!) and I immediately took their inbound certification course.
Next thing I knew I was working for a HubSpot partner agency having never used the platform before. I logged onto our HubSpot portal for the first time and was overwhelmed by it all.
Even though learning the HubSpot platform was part of my onboarding process, I still felt dumbfounded by all of its capabilities and features — and if you’ve never used the software before, you might be overwhelmed by the thought of it, too.
Luckily, HubSpot’s training library gives you an incredibly in-depth view of the platform and everything you can do in it.
If the software is a staple in your marketing program, I highly recommend going through these training videos, but if you’re just starting out and aren’t ready for the full monty, you may just need a 50,000-foot view of the major components of HubSpot’s digital marketing tools.
Below, I've shared some great first steps to help you navigate and understand the basics of HubSpot as you begin your journey with it. As you've probably already realized, the tool is robust, so I've broken them up by seven of HubSpot’s major feature areas to help make them easier to digest.
Dashboard
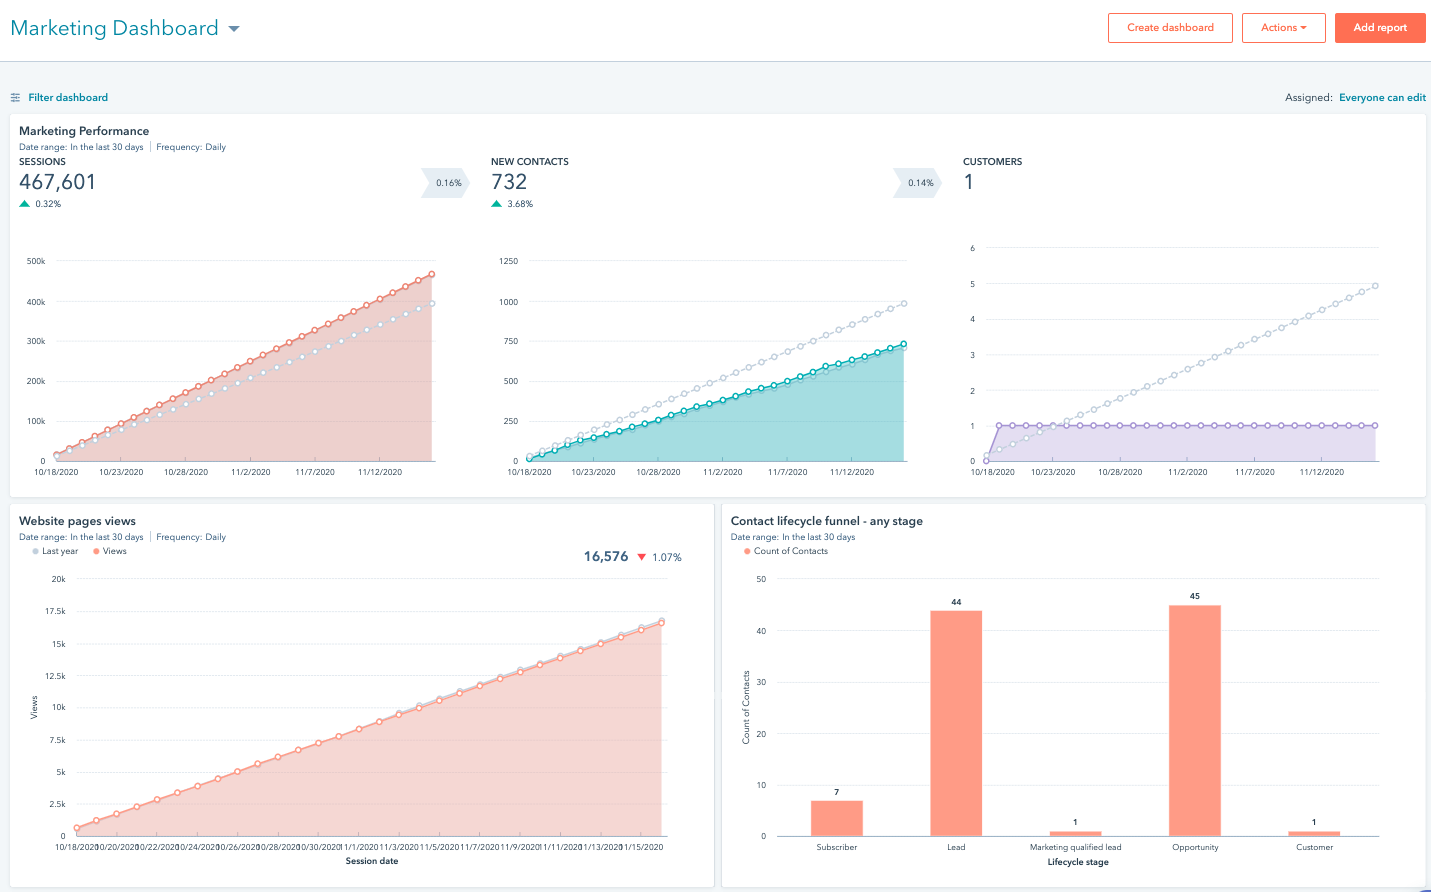
The Dashboard is one of my favorite features of HubSpot — it’s like your home base.
It takes all the data that you’ve collected and aggregates it into easy-to-read charts and graphs.
When you first land on the default Marketing Dashboard, it gives you a high-level view of the most commonly tracked marketing metrics such as how many site visits, contacts, and customers you’ve generated that month, and superimposes it on the data from the month before so you can see if you are improving.
Just like the dashboard of your car shows you stats about your car (how fast you’re going, if you need to check the engine, etc.), the HubSpot dashboard gives you the stats you need to quickly see how your marketing is performing and lets you know if you need to open up the hood and take a deeper look at what’s going on inside.
You can even customize your dashboard to show just the Key Performance Indicators (KPIs) that are most important to your business.
First steps for using your dashboard
If you've just logged into your portal for the first time and your marketing dashboard is showing absolutely nothing, that's because you don't have the HubSpot tracking code set up yet!
Use this guide to install the tracking code on your website to start collecting traffic analytics on your site immediately.
Next, jump in the report library to check out all of awesome pre-built reports you have at your disposal, and start adding your favorites to your dashboard.
Contacts tab
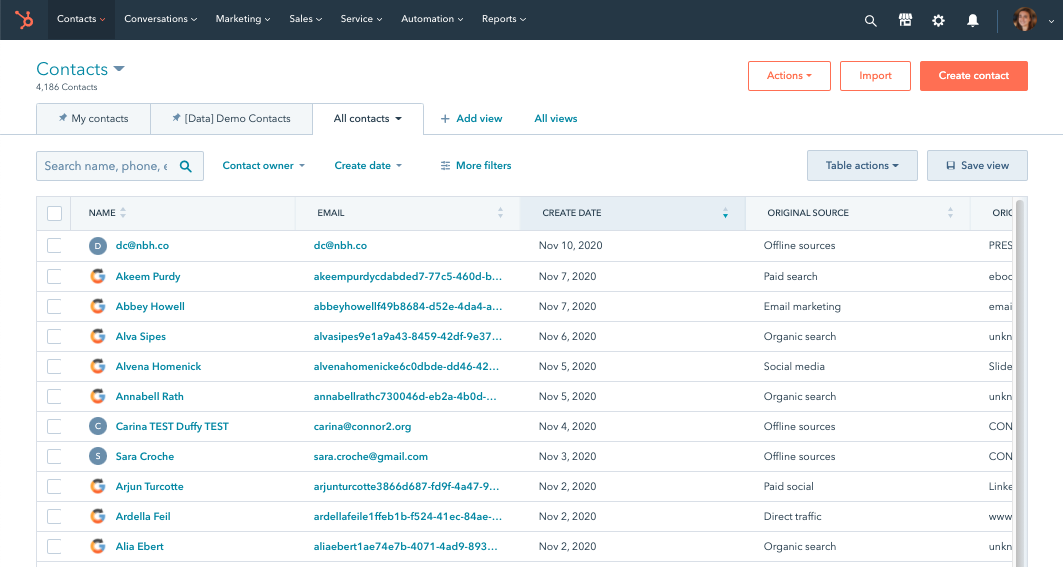
At its simplest (and most obvious), the contacts tab of your HubSpot navigation is where all of your marketing leads live, but there is a lot more to the tool than just names and emails.
Within the contacts tools, you can create customized, filtered contact views and segmented lists.
A general principle with these is: if you can think of it, you can create a filtered view and a list for it.
These tools are fantastic for viewing and segmenting your contact database, and as you dive into their specifics you will see just how much you can do with them.
First steps for using the contacts tool
One of the key steps for anyone getting started in HubSpot is moving your contacts into the platform — unless you're completely starting from scratch, of course, but that's a pipe dream for most of us...
Use this guide to walk through the entire import process - from preparing your import, to doing the actual import, to viewing and analyzing your import.
Once you've got real life contacts in your portal, make sure you play around with creating and saving filtered views and building active and static contact lists.
Conversations (live chat and chat bots)
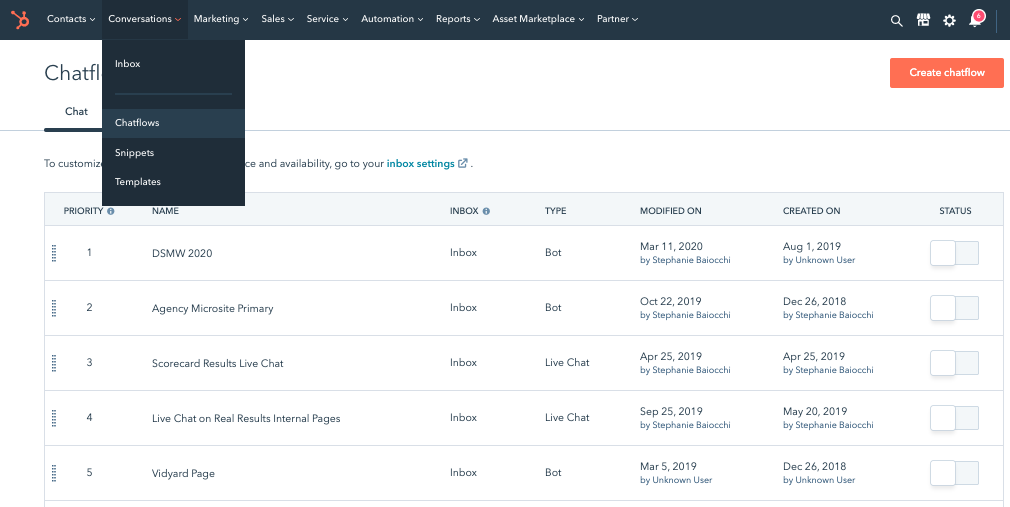
The conversations tab in your portal is where the live chat and chat bot functionality lives (called chatflows).
You can view, manage, and respond to any incoming conversations in the conversations inbox, and if you're finding yourself sending the same responses over and over again, you can create saved text snippets and email templates.
While much of the conversations functionality is typically used by customer service or support teams, marketers can certainly leverage the live chat and chat bot functionality to meet visitors where they are and help answer questions they have.
First steps for using conversations
Depending on how you plan to use HubSpot, you may or may not want to go in and set up live chat, chat bots, or a team inbox right away, but one thing just about anyone, no matter what their role is, can use in HubSpot is email templates.
In order to use them, first connect your personal email to HubSpot. Then, create up to five email templates based on the emails you end up copying and pasting over and over again.
If you already know you want to use live chat, chat bots, and/or the team inbox, here are some resources for getting you started:
- Create a chatflow with live chat
- Chat with your website visitors
- Create a chatflow with a bot
- Choose your bot actions
- Create a conversations inbox and connect a team email
Marketing
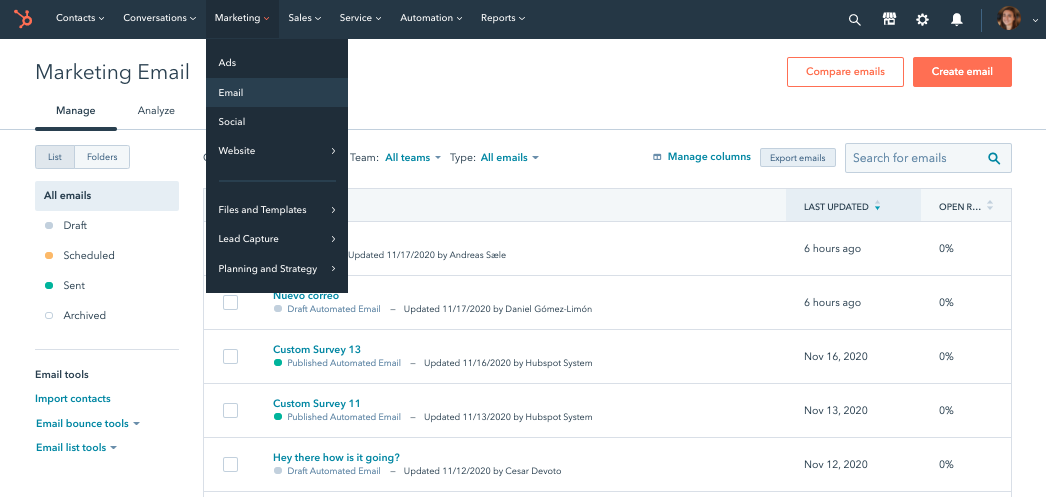
The Marketing tab of your HubSpot is where it gets really good — it’s the meat and potatoes of your marketing operations.
Since this is where the bulk of your marketing tools live, let's break this section down a bit more by each item in the navigation:
First steps for using ads
This is where you can track and report on your Facebook, Google, and LinkedIn ads. If you're using any of these ads platforms, I highly recommend getting your accounts connected in this tool as soon as possible!
First steps for using email
This is probably one of the main reasons you're getting started with HubSpot in the first place! HubSpot's drag-and-drop email creator makes it easy to create and send awesome-looking emails. First things first: Before you send an email, make sure you connect your email sending domain!
First steps for using social tools
With the social tools, you can schedule, publish, and analyze the performance of your Facebook, Instagram, LinkedIn, and Twitter posts. Get your social accounts connected to HubSpot as soon as possible so you can start collected all of that great data!
First steps for using website tools
If you’re creating any piece of content for your website (landing page, blog post, or website page if you're using the CMS), this is where you go. In order to leverage any of these tools, you'll need to make sure you connect a subdomain to HubSpot.
First steps for using files and templates
The file manager allows you to organize and access any file you’ve ever uploaded to HubSpot with an easy-to-use search feature and folders, and the design manager is where the developer tools live.
I recommend setting up an organizational system in your file manager as soon as you can (with folders), so as you're adding different campaign assets like images and PDFs, you're able to keep them organized and easy to find.
First steps for using lead capture tools
Convert and capture leads using the call-to-action (CTA) and forms tools. You can’t collect contacts without forms, and HubSpot has a simple and easy form creator to set up the necessary fields for all of your landing pages and gated content.
There's no better way to get started with these two tools than to jump in and start creating them!
First steps for using planning and strategy tools
HubSpot Marketing Hub has several tools to help you plan out your marketing strategy before you execute it — a calendar for planning out content, campaigns for tracking results across multiple assets, an SEO tool for building your content strategy, and projects for managing to-do lists for any project you're working on in HubSpot.
Make sure you check out the SEO tool as soon as you get the tracking code installed on your site. It has all kinds of actionable tips for improving your site's organic rankings.
Sales and service
You may be thinking, I purchased the Marketing Hub, why do I have a sales and service tab in my portal?
Don't worry, you didn't accidentally purchase another hub — because HubSpot has free versions of their three major hubs (marketing, sales, and service), your portal automatically has access to those free tools.
Once you've gotten up and running with the Marketing Hub, I recommend checking out the sales and service tools. You may be surprised by what you see, and what your team could use!
Automation
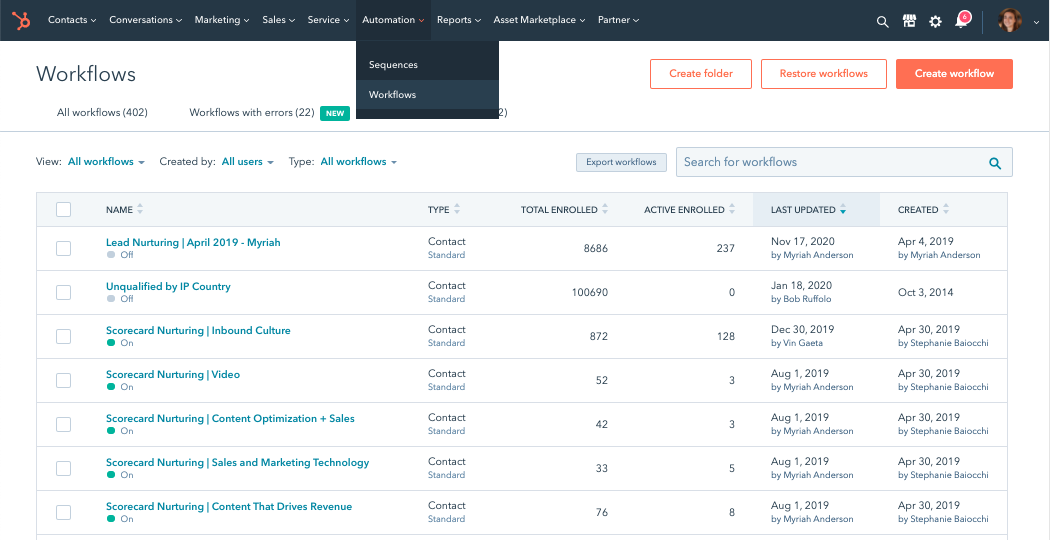
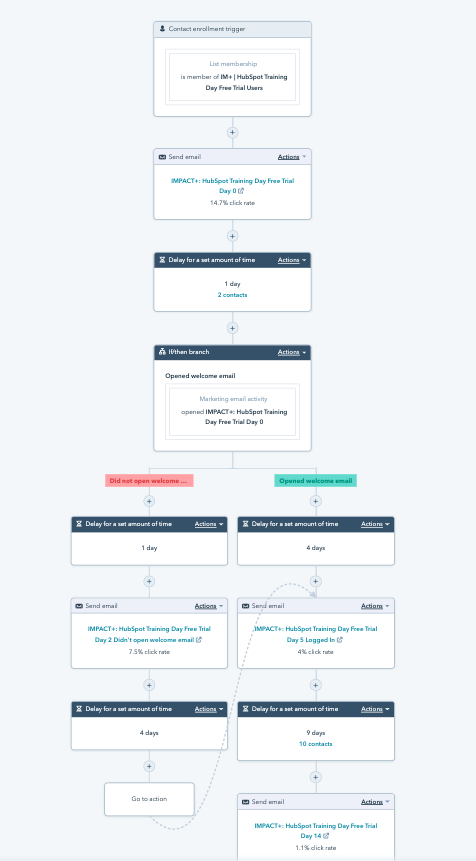
HubSpot's automation engine is a tool called workflows, and let me tell you it is powerful.
Workflows allow you to automate processes in your portal — from sending lead notifications and assignments to the appropriate person on your team, to building email nurturing campaigns, to managing your data.
It's so powerful, we wrote a whole guide on it! Check it out here.
First steps for using workflows
If you're not ready for the complete guide, the best place to start with workflows is to think of a process you'd like to automate in HubSpot, and then work through the steps in this knowledge base article to actually set up your first workflow.
For example, when a contact fills out your quote request form, you want HubSpot to automatically assign it to your salesperson and notify them. This is a simple workflow setup that will get you familiar with the tool without getting overwhelmed by all that's there.
Note: The sequences tool is a paid Sales Hub feature.
Reports
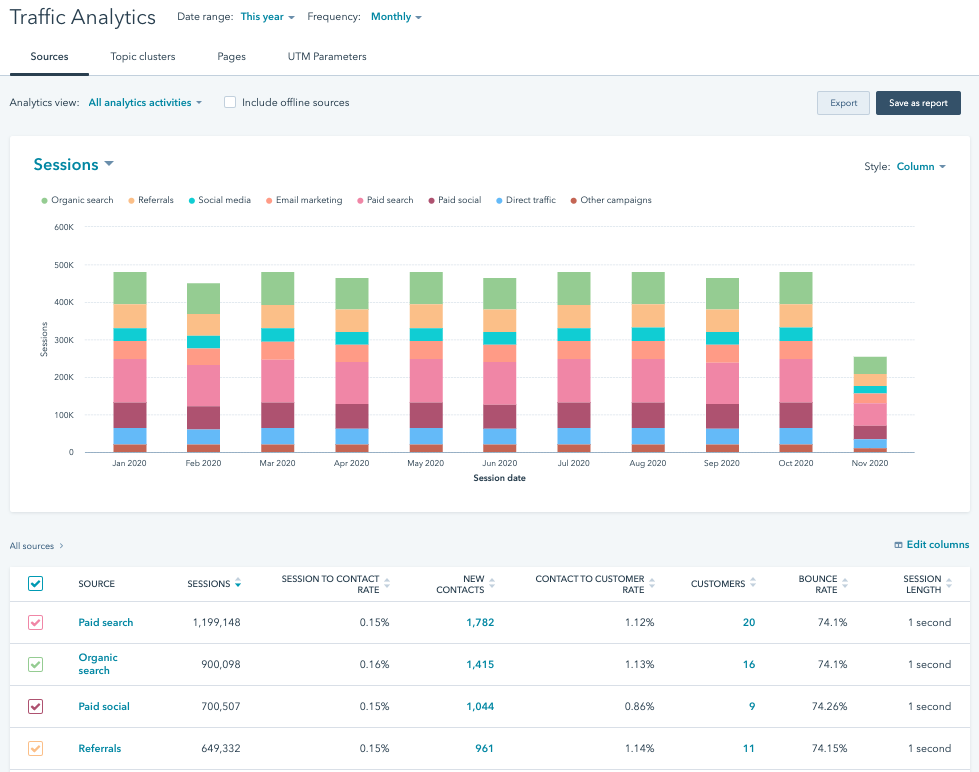 Last, but certainly not least, the Reports dropdown is the one I frequent the most.
Under this tab, you can create a report for almost anything you can think of and get a deeper look at your marketing’s performance.
The analytics tools have several pre-built analytics views for digging into your traffic and contact data.
The sources section, shown above, is one of the most useful tools in the HubSpot platform. In it, you can see where all of your website visitors are coming from and what percentage of them are converting from each source.
While the pre-built analytics tools are excellent, every company has different reporting needs. The reports tool is where you can build completely custom reports on the data you're collecting and storing in HubSpot.
All in all, the tools in the Reports tab are a smorgasbord of great information for you to use as a marketer!
First steps for using reports
Since you've already installed your tracking code and checked out the reports library (covered in the Dashboard section), it's time to jump into checking out the analytics tools.
You'll likely see a few different ones when you land in the analytics tools section, but two of my favorites that I recommend checking out first are the traffic analytics and the campaign analytics tools. Starting with those two tools will give you more than enough to digest as you're getting going!
You can do it!
If you’re new to HubSpot or just looking into it for the first time, don’t worry. While a number of features and capabilities can be overwhelming your feelings will quickly turn to excitement as you learn all that HubSpot can do for you.
Take one feature at a time, and you will realize that much of HubSpot is user-friendly and easy to learn, and you will begin to see how much easier your life as a marketer is now that you have this tool in your belt.
Happy HubSpotting!

Order Your Copy of Marcus Sheridan's New Book — Endless Customers!

