Subscribe now and get the latest podcast releases delivered straight to your inbox.
 Achieving a high rank on search engine results pages isn't a walk in the park these days.
With Google ripping the rug out from underneath our feet every time we feel like we've found our footing in the crazy SEO world, it's easy to lose hope.
Between coming up with a blog topic, configuring a workable title, and crafting the content, blogging is like a digital workout (or at least that's what I like to tell myself).
The trouble with blogging is that creating the content is only half the battle. Optimizing your posts is what really gets bloggers sweating, which is why we've decided to detail the process.
Listen up HubSpot users, we've come up with a step-by-step process to help you effectively optimize your blog posts to succeed in search engine results.
Employ a Compelling Blog Title
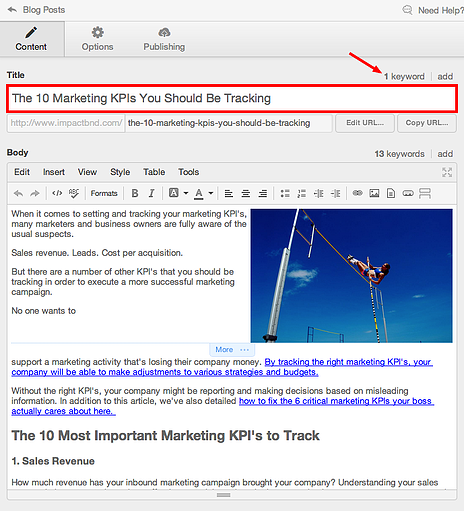
If you're using HubSpot's software to publish your blog posts, an optimized blog title is a logical place to start. Using a keyword or keyword phrase in your blog title will help to rank in search engine results, but there is a science to it. Keyword perform best when they are placed at the beginning of your title, so do your best to work the word or phrase in early.
While keywords are important, you want to your title to be both clickworthy and shareable so focus on presenting the value up-front. The more shares your post receives, the better chance it stands in terms of search engine results pages.
In terms of format and style, we encourage you to play around with it a bit. Number posts like the one in our example tend to perform really well because they set the reader's expectation for what they are going to get out of the post. Keep in mind the way people search when you are coming up with a title format. It's no secret that people are often searching in question form, so consider crafting "how-to" titles that present themselves an answer to their question.
After you cement a optimized title, be sure to make sure your URL (located directly below the title field) is optimized as well. In this case our URL is the same as the title, however if you have a title that is a bit more playful, feel free to use a more straightforward URL that is more search engine friendly.
Note the HTML Header Hierarchy
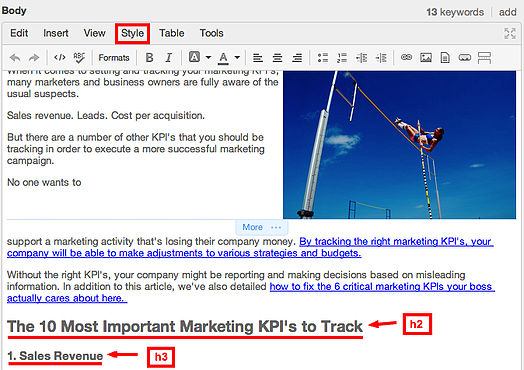
Under the style -> format -> headers option in the drop-down menu, you will find your page headers.
In order to make the most of of your headers be sure that you are tagging them so that search engines can find them easily when they crawl your page.
HTML headers range from h2-h6, and they descend in order by level of importance.
When it come to optimization, your blog headers are no exception to keyword inclusion. Keep in mind that when you're creating headings you want to keep them as short as possible in order to maximize the weight the search engine places on your keyword.
While you should only use one h2 per blog article, feel free to use h2 and h3 tags where you see fit.
Nail Your Meta Description
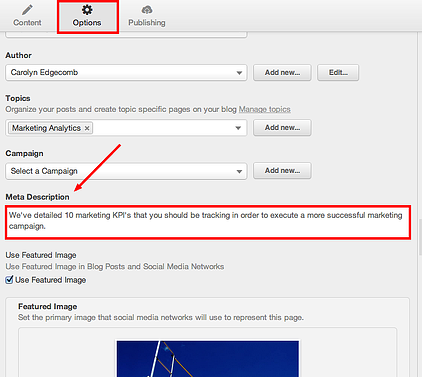
The meta description is located under the options section at the top of your screen (sandwiched in between 'content' and 'publishing').
Essentially, your meta description determines the summary that searchers will see under your title on search engine results pages. You want to define a clear, concise description in order to increase the likelihood that a searcher will find your article useful, and in turn click it.
You'll want to include at least one focus keyword or keyword phrase. The more you can use the better, but don't dilute your message just to squeeze in more keywords. The description should be short, so overloading it with too many keywords will sound unnatural and potentially ruin your chances of being chosen by a searcher.
Optimize Images for Search
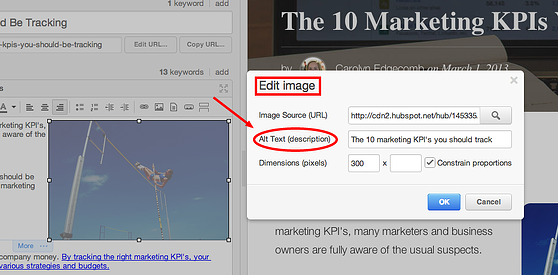
Under the Insert -> Image option in the drop-down menu, you will find a photo uploading tool. You can either select an image from your existing uploads, or upload a new image for your post.
Google can only index images formatted as BMP, GIF, JPEG, PNG, WebP, and SVG, so make sure that your image is formatted properly to ensure that it can be picked up by them.
Once you've upload an image, you'll want to pay attention to two things: the file name, and the image's alt text.
When naming your file you want to be as descriptive as possible. If Google cannot locate text on the page that references the image, it uses your image's file name to describe it in search results. So before you save your image as something generic like BlogPhoto.PNG, consider something that would be better suited for search results.
Additionally, an image's alt text is used to describe the image to make it easier for Google to organize it in terms of search queries. It also serves as clarification for someone with a visual impairment, making it easy for them to interpret what the image is without seeing it. If you've upload a photo of an apple in a blue bowl, you'll want to use that as the alt text, rather than something more ambiguous like just 'apple'.
Include Keywords in the Body
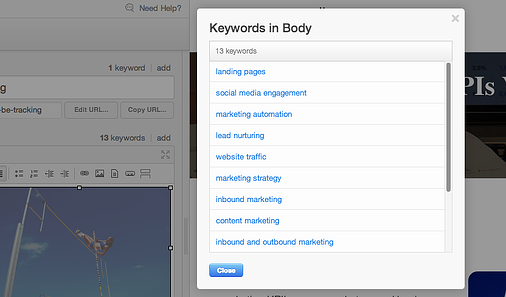
Above the content field you will notice that there is a tracker that will update as you pepper in each new keyword. When optimizing your blog, you'll want to incorporate a handful of keywords throughout the body of your text, but avoid going overboard. The minute it begins to sound unnatural, abort the mission.
A super keyword-heavy piece of content can take away from the actual valuable information you are presenting, as it is both distracting and it often takes away from the tone of your post.


Order Your Copy of Marcus Sheridan's New Book — Endless Customers!

