Subscribe now and get the latest podcast releases delivered straight to your inbox.
 52% of marketers have gained a customer through Facebook, and 35% have gained a customer through Twitter. (Source: Media Bistro)
Not to mention every second, two new members join LinkedIn. (Source: Fast Company)
Lets face it, promoting your content, interacting with your customers, and sharing valuable content from other industry thought leaders on social media platforms is the new fad.
Unfortunately, social publishing can be bit of a time sucker for busy marketers.
HubSpot's social media publishing tool is designed to take a little bit of the suck out of the time it takes to schedule and publish social media posts that have the power to drive traffic back to your website.
Simplifying the way in which we organize our social media posts, HubSpot's tool serves as a helping hand for all marketers looking to tackle multiple social platforms without sacrificing the quality of their content.
So how does it work?
Follow our step-by-step tutorial below to learn how to schedule your social media posts with ease.
1) Select the Publishing option from the Social drop-down menu
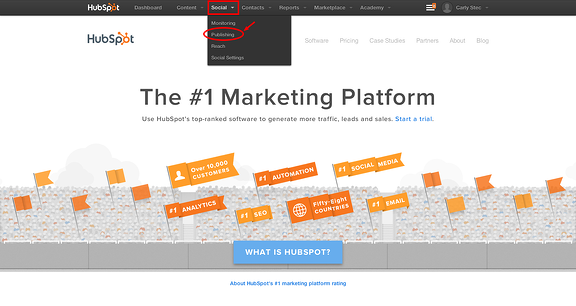
From here you will be directed to your social media publishing dashboard.
2) To filter your dashboard select the type of post, channel, and campaign you wish to view from the drop-down menus.
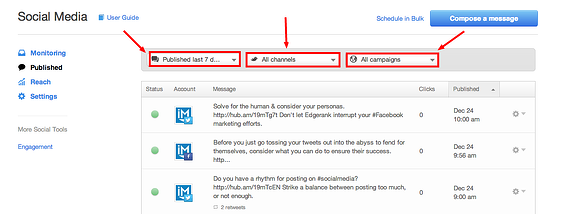
If you have not posted any social content within 7 days your dashboard will be empty. However, HubSpot allows you to filter through posts that you've published at any time, as well as the posts you have scheduled.
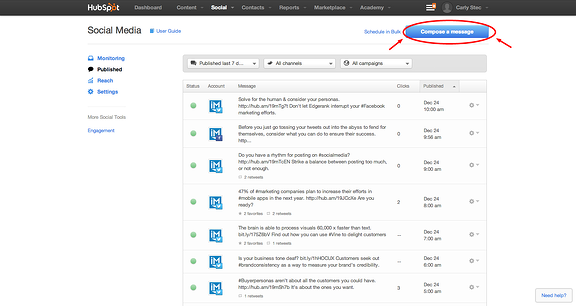
3) Select the 'Compose a Message' button in the right-hand corner.
4) Select the account that you wish to publish your content to.
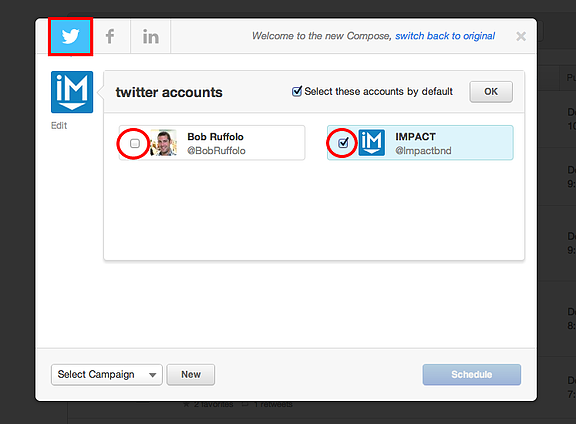
HubSpot makes it easy to switch between publishing posts to Twitter, Facebook, and LinkedIn. Simply select any of the social icons from the top bar to get started. From here you have to option to switch between different accounts for each platform by selecting the 'Edit' option on the left.
5) Use the Attach drop-down menu to insert blog posts, landing pages, and images, or input outside content.
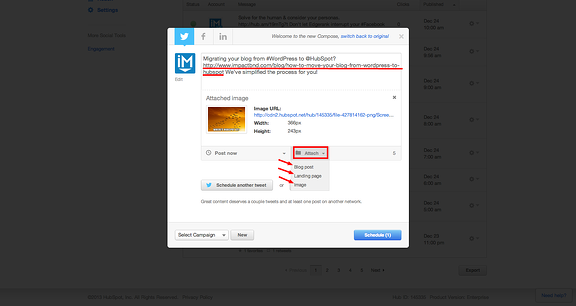
After selecting an option from the Attach drop-down, for example blog posts, a list of your HubSpot blog posts will appear. Simply click the select button next to the title you wish to post and HubSpot will automatically pull the title and link into the content box of your post. However, you do have the option to customize the text if you do not wish to post just the title (we suggest you get creative).
Keep in mind that if you opt to use non-HubSpot links they must begin with https://
6) Select a time and date for your post.
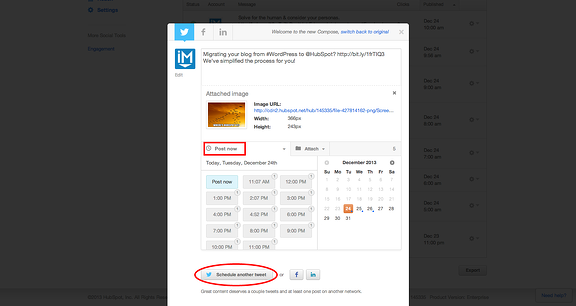
Next to the Attach drop-down is a menu that allows you to select a publish time and date for your post. You can choose post now, or schedule a custom time. On the right-hand side will be a calendar where you can select the respective date for your post.
Once you have that set, you now have the opportunity to select the 'Schedule another tweet' option, switch to Facebook or LinkedIn by selecting the appropriate icon, or simply hit schedule to complete the process.

Order Your Copy of Marcus Sheridan's New Book — Endless Customers!

