8 Musts When Setting Up Your HubSpot Portal (That They Don’t Usually Tell You)

By Carina Duffy
May 9, 2018

So you just bought HubSpot, huh? And you’re wondering what the heck to do next, huh?
Chances are if you’re feeling this way, you’ve heard about all of the amazing things that HubSpot can do for your marketing and sales teams, and you can’t wait to get it up and running.
In my years at IMPACT, I’ve worked with numerous clients in that same position. So, I’m here to pull back the curtain and walk you through the most important first steps you need to take to set yourself up to get the most out of your HubSpot portal.
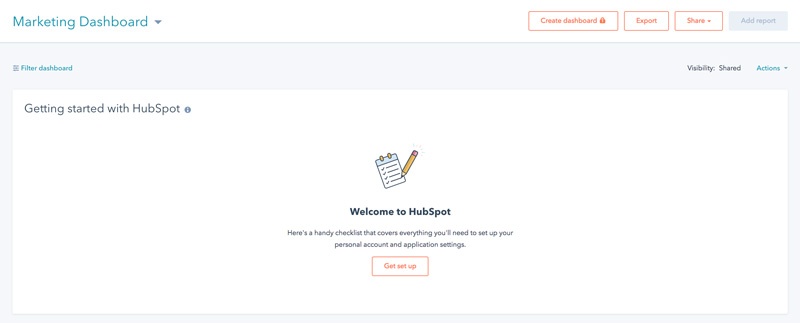
If you log into your HubSpot account and your dashboard looks like this, then this article is just for you:

The Obvious
If you’ve got a fresh, baby-faced portal, the good news is that you have all of power in your hands to set things up in the best way possible.
The other piece of good news is that HubSpot has a load of great resources to help you get different pieces of your portal setup.
The very first step you need to take is to log into your HubSpot portal and go to your Dashboard.
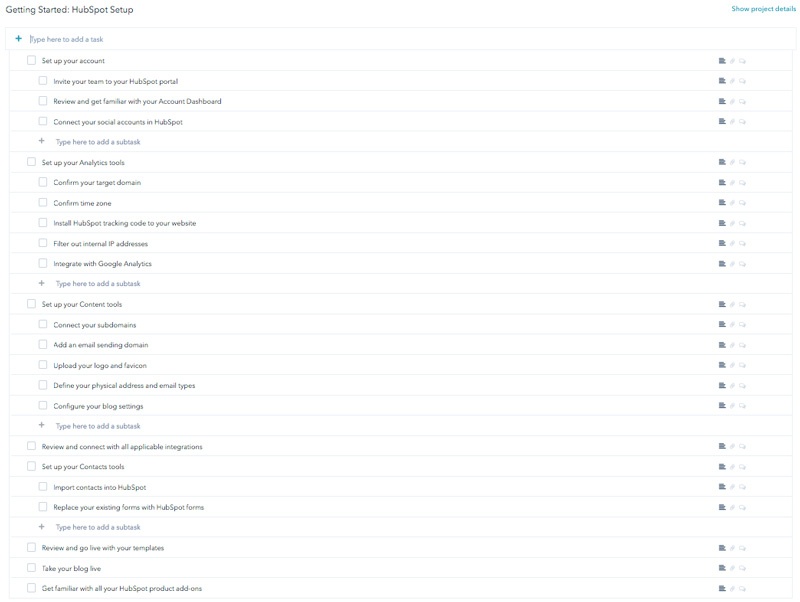
You’ll see what’s pictured in the above screenshot, with a module labelled “Getting started with HubSpot.” When you select “Get set up” you’ll be taken to the HubSpot Setup project in the Projects tool. (see below)

This is hands down my favorite thing HubSpot has set up for its new users. It’s a simple and straightforward checklist of all of the things the team wants you to make sure you get set up in your portal to get the most use out of it.
There are helpful descriptions and links for each task, instructing you how to complete them, and you can even assign specific team members to them and set due dates.
Here are a few highlights from that list:
1. HubSpot Tracking Code
If your website isn’t built on HubSpot, your unique tracking code is the single most important piece of your HubSpot setup. Without it, HubSpot won’t be able to monitor things like views, time on page, and all of the other helpful analytics and reporting you probably heard about in the sales process.
Note: If your website is being built on HubSpot or migrated to HubSpot, you can skip this! Your site will automatically be tracked.
The tracking code is the foundation of everything you’ll be doing with HubSpot.
If you’re on WordPress, the process is as simple as adding a plugin and adding your unique code to that plugin. If you’re on another platform, you’ll simply have to add a piece of code to the footer of your site - no big deal!
2. Google Analytics Tracking
With some of HubSpot’s recent updates to their analytics engine, the line between HubSpot’s analytics and Google Analytics is getting more and more blurry. You can now see data like bounce rate and average time on page right within HubSpot.
So is Google Analytics even necessary anymore? The answer is yes, and here’s why.
While HubSpot’s analytics are great for reporting and high level data, Google Analytics gives you the ability to dive much deeper into your data, and also integrates seamlessly with your other Google accounts like AdWords.
Most marketers, including the IMPACT team, will use a combination of both HubSpot and Google Analytics.
Once you’ve got your HubSpot tracking code live, make sure you get your Google Analytics tracking set up as well.
If you’re going to be creating landing pages or any website pages (or if your site is being built on HubSpot), HubSpot makes it really easy for you to get your GA synced up - it’s as simple as adding your tracking ID to your content settings.
This will ensure that Google Analytics is able to track ALL of your site pages properly.
3. Setting Up Subdomains
Planning on making some amazing, high-converting landing pages? If your main domain isn’t built on HubSpot, you’ll need to set up a subdomain (eg. “content.yourdomain.com”) in order to create any pages.
This can get a bit technical because most of the work is going to have to be done via your DNS provider, but HubSpot makes it easier on you with instructions for the most common providers here.
4. Connecting Social Accounts
HubSpot has recently stepped up their game on the social publishing front. Numerous platform updates make it easy to schedule, publish and monitor social posts across Facebook, LinkedIn, and Twitter, and now even Instagram.
You’ll not only be able to manage your social accounts on HubSpot, but when you connect your social accounts you’ll get additional lead intelligence on the leads coming to you from social media sources.
This makes it extremely valuable to connect your social accounts even if you won’t be using the tool for publishing posts.
5. Setting Up Email Domains
Before you get too far into this one - it’s important to know you can send emails from HubSpot without setting up a specific email domain. The only caveat to this is that if you don’t, it’ll show the text “via HubSpot” at the top of all of your marketing emails.
If you’re planning on doing personalized or segmented emails (which you should be), that’s something you’ll want to avoid, so, it’s recommended to set up an email domain.
Again, this can get a bit technical, but HubSpot has some great materials to walk you through the process.
6. Contact Import
If you’ve been collecting leads or contacts at all before pulling the trigger on HubSpot, you’ve probably wondered how you’re going to get those leads onto the platform for email marketing and lead nurturing among other things.
The answer is: a bulk contact import!
Unless your contacts are in a database that already integrates with HubSpot (eg. Salesforce), you’re going to need to do a bulk import of your contacts via CSV.
Again, HubSpot makes doing a standard contact import simple, and even provides you with a sample spreadsheet to base your formatting off of.
However, depending on the data you’re trying to bring into HubSpot, this can get complicated, and that brings us to the not-so-obvious elements of an effective portal setup.
The Not-so Obvious
HubSpot’s portal setup project is a fantastic start, and I walk through each of those tasks with all of my new-to-HubSpot clients.
However, after setting up so many portals, I’ve learned there are some not-so-obvious pieces to this puzzle t I want to add to your setup task-list.
7. Contact Import - A Deeper Dive
While doing a basic contact import is simple and gets the job done, you may find you have additional data that you want to bring into HubSpot that doesn’t fit perfectly into its out-of-the-box contact properties.
Before you do your contact import, spend some time deciding on what data is most important and useful in your marketing and sales process and decide what custom contact properties you want to create based on that.
If you’ve never heard of or created custom contact properties before - you’re going to want to get a handle on this first!
Although you can create custom properties during the contact import process, I recommend creating them beforehand, so you can make sure you set them up properly and aren’t rushed through the process.
8. All of the Subtle Settings
With a tool as robust as HubSpot, you better believe there are a lot of settings in the back end you can play around with.
Once you’ve gotten all of the above ironed out, take some time to go into your Settings and read through all of the different defaults .
This will help you wrap your mind around the general layout of the back end, and you’ll likely find some things you want to change.
Here are a few default settings you’ll likely want to adjust:
Creating and Associating Companies with Contacts
One of my favorite little HubSpot settings that often goes unnoticed is “Automatically create and associate companies with contacts.”
You can find this in the Contacts & Companies settings, but it’s turned off by default.
When this setting is turned on, HubSpot will create company records for you based on a contacts email domain via information gained from HubSpot Insights.
HubSpot Insights can pull all kinds of data on a company like number of employees, annual revenue, LinkedIn URL, and more.
Adding Users & User Settings
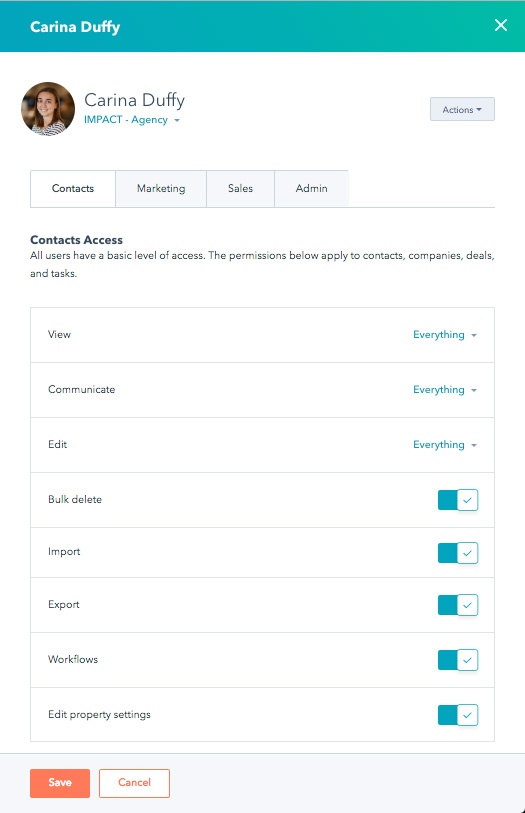
One of the most confusing settings to adjust in HubSpot is individual user access. When you’re setting up your portal, make sure everyone who needs to have access has it.
HubSpot allows you to give different users different levels of access so you don’t have to worry about anyone getting their hands in somewhere they don’t belong. However, while this is a great feature overall, it can be confusing to set up.
HubSpot breaks user permissions down into four categories: Contacts, Marketing, Sales and Admin, and you can set different levels of access for each user under each one of those categories.

Take a look through this permissions guide and make sure you’ve given all of your users the correct levels of access in all categories.
If not, you’ll soon have frustrated teammates who can’t get anything done because they don’t have access to the right tools.
Blog Setup
If you’re going to have your blog hosted on HubSpot, there’s a lot already set up for you - blog subscriber lists, blog subscription emails, and even a blog subscription form, but all of this is purposeless if you don’t spend some time in the Blog Settings.
That’s where you’re going to want to turn on things like blog subscriber notification emails and adjust your social sharing settings.
If you don’t have your blog settings set up properly, you run the risk of missing out on engagement opportunities with your readers - like people subscribing to your blog and never being sent your blog content.
Don’t forget to dive into all of the blog settings tabs before pushing your HubSpot blog live!
Double Opt-in
With the onset of General Data Protection Regulation (GDPR) in Europe, many companies are choosing to use double opt-ins for emails to remain compliant. Double opt-in is when someone subscribes to receive emails from your company, their sent a confirmation email, and must click a link in that email to officially opt in to receive emails from you.
Besides GDPR compliance, the benefit of using double opt-in is that you ensure that the people who are joining your email lists actually want to get your content. This equates to a more engaged database, and a lower likelihood that your emails will get reported as spam.
HubSpot makes this easy for you (have I said this enough??). You just need to make sure you set it up.
If you go to Email Settings under the Subscriptions tab, you’ll find a toggle to enable double opt-in, and when you do you’ll be given additional options for setup.
Go Get ‘Em!
While starting with HubSpot can be overwhelming at times, let me assure you - any initial setup pains are well worth the results you’re going to get if you truly dive in! So get out there, get set up, and start crushing it. Need help? We’ve got you!


Order Your Copy of Marcus Sheridan's New Book — Endless Customers!